System management with Foreman/Katello - Part 1: Introduction and installation
The last couple of years I spent a lot of time in managing Linux systems with Spacewalk and Red Hat Satellite 5. Because the application was superseded by the vendor, I investigated on migrations to the successor.

Back in 2008, Spacewalk was published as upstream project to Red Hat Network Satellite. Since then, a lot of development happened thanks to the numerous developers - e.g. within the community and other companies (such as SUSE). Since 2014, development stagnated - at least for Red Hat because of the general availability of Red Hat Satellite 6, the successor of Red Hat Satellite 5.
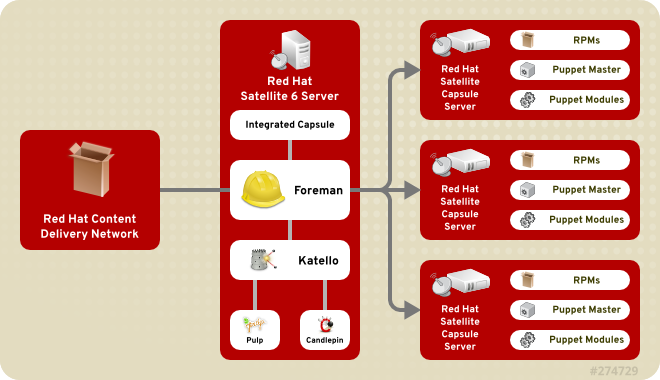
In comparison to Red Hat Satellite 5, the new major version is based on Foreman and Katello - and because of this, the migration was more complex for me as I haven't worked with those tools before.
With this post I'm starting a series focussing on starting with Foreman and Katello. The first post deals with installing the software.
What is Foreman?
Foreman is a lifecycle management suite - this means, it focusses on all the tasks that are necessary to create, configure and monitor a system. In that case it is completely regardless whether a physical or virtual system or a Docker container should be managed. Physical system can boot from the network in order to be deployed in a automated and standardized way with Foreman. By using additional plugins, additional hypervisors and cloud platforms can be accessed - such as:
- VMware
- oVirt
- Amazon EC2
- Microsoft Azure
- XEN
- OpenStack, OpenNebula
Especially by supporting OpenStack and OpenNebula, hybrid cloud scenarios can be managed.
For the configuration management, Puppet is used by default - by utilizing plugins, Chef, Salt or Ansible can also be used (beginning with Red Hat Satellite 6.3, also Ansible is supported - other plugins are unsupported). Using the web frontend, appropriate configuration rules can be created and the conformance over the system landscape can be verified.
Foreman is multi-mandatory-capable - all objects (hosts/hostgroups, users/usergroups, networks,...) are differentiated by organization and location. Every access is controlled by a roll-based configuration. This also ensures reproducing big infrastructure concepts. Regarding authentication, Microsoft Active Directory Domain Services as well as all LDAP-capable sources are supported - including FreeIPA.
To name another benefit - Foreman comes with a well-documented RESTful API, that builds the base for the huge amount of plugins. A well-known tool is the mighty command line-interface hammer that uses this API.
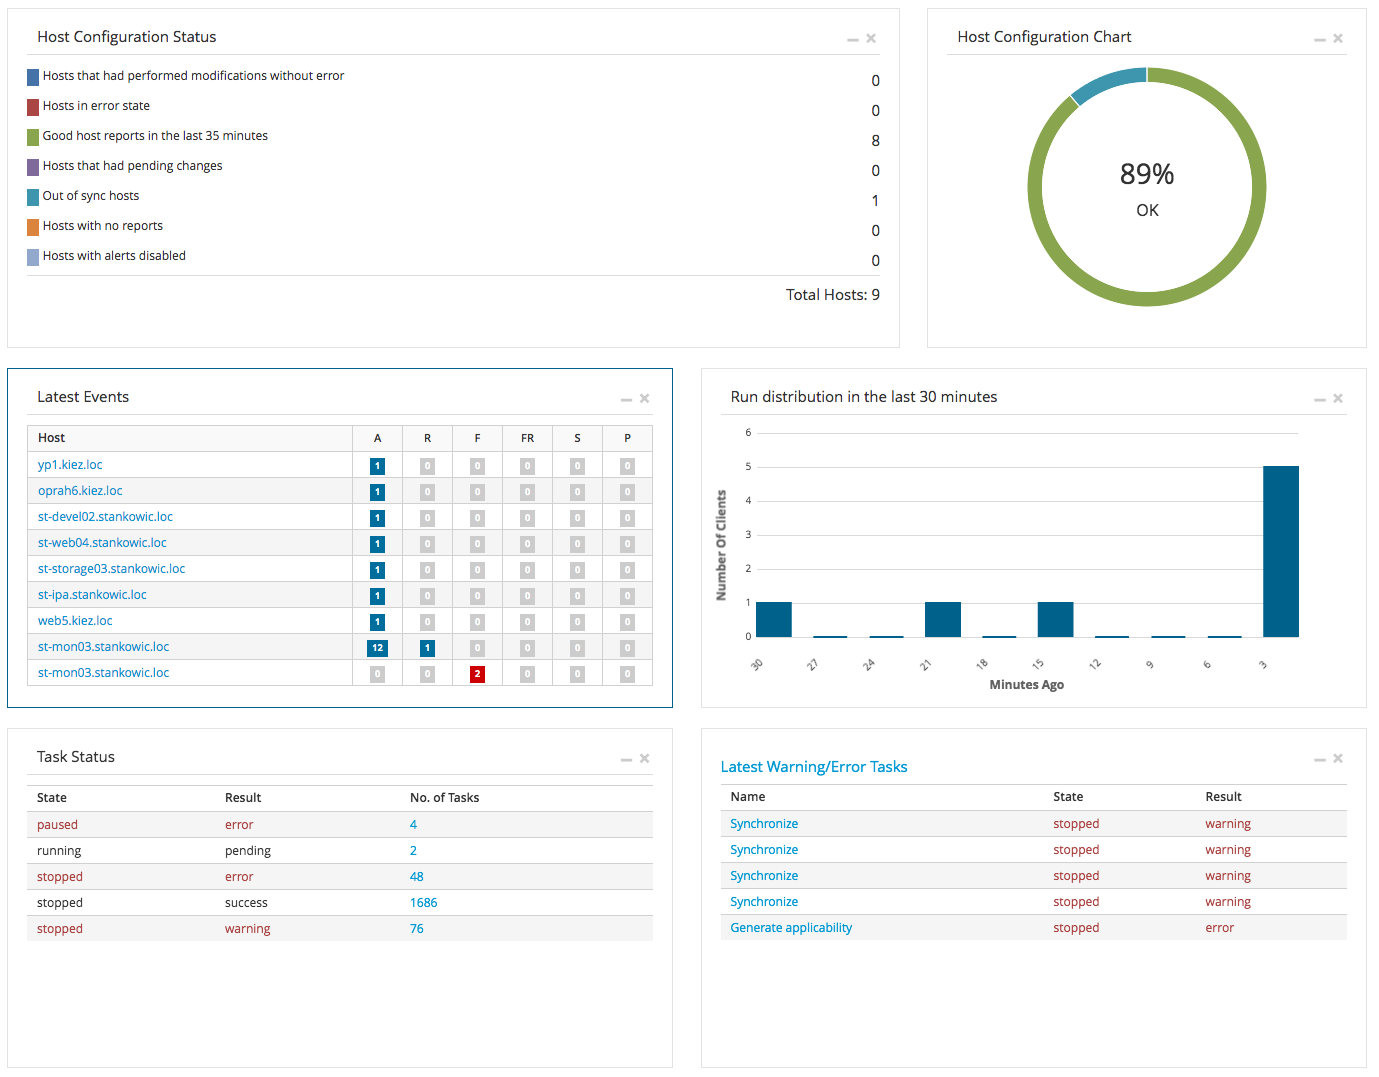
Foreman offers a dashboard that lists a lot of infrastructure information - such as:
- Host configuration overview
- Last activities
- Tasks and error overview
- Recently imported patches
Beyond that, Foreman also offers audit functionality, that lists recently executed changes - e.g. configuration of managed systems. Especially in bigger teams and system landscapes, this is a very important feature.
What is Katello?
Katello extends Foreman by content management functionality by combining the software projects Pulp and Candlepin.
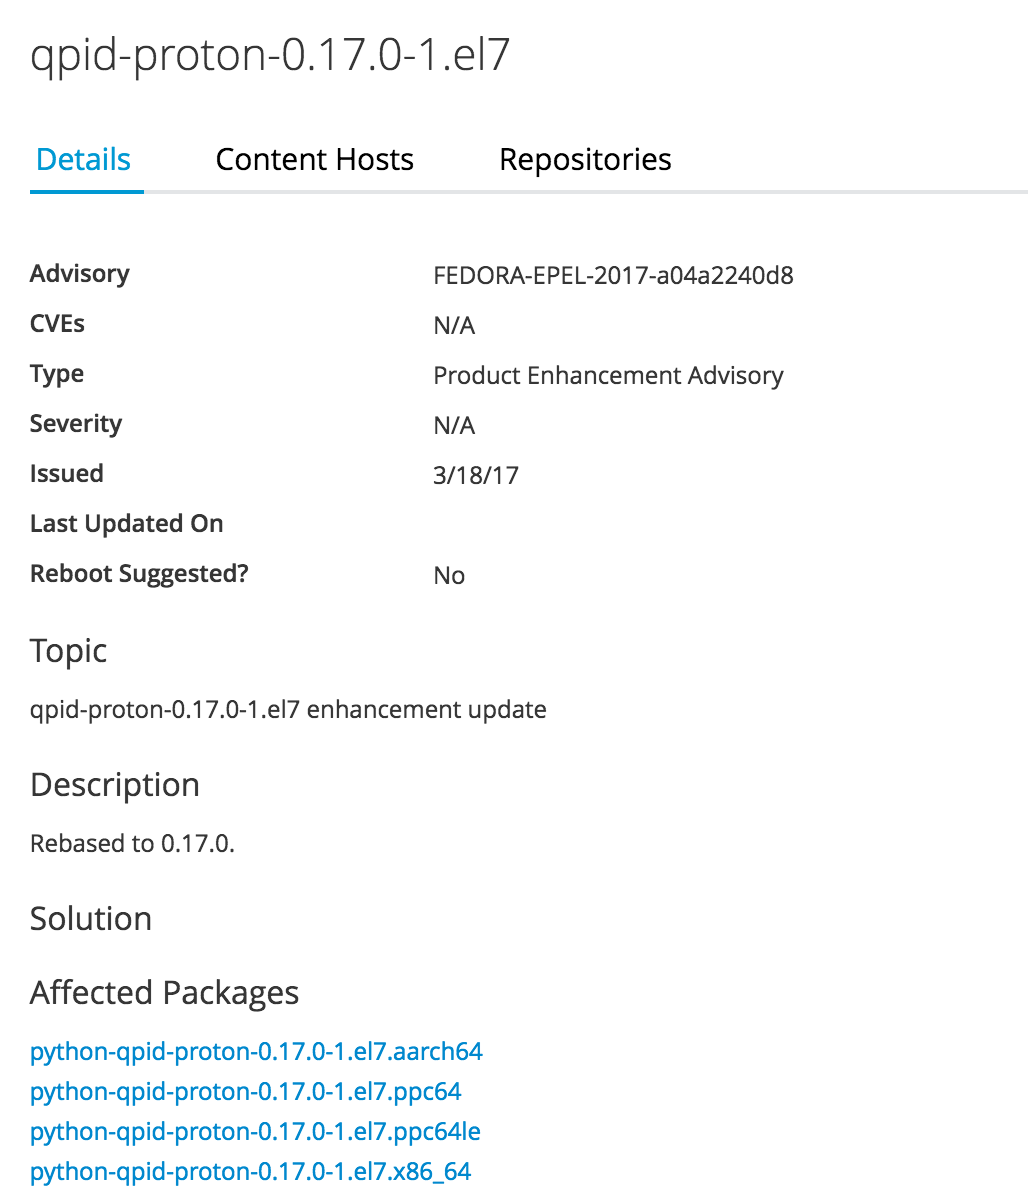
Pulp deals with synchronizing RPM packages, Docker and Puppet modules and OSTree content over repositories. In addition to this, the software is capable of importing errata information. An erratum extents a package update by additional information such as:
- Type (Bugfix, security fix, feature enhancement)
- Summary and detailed description
- CVE information (Common Vulnerabilities and Exposures)
As of now, only RPM-based distributions are supported. There is a project focussing on Debian support, but it is far away from a "usable" state. Other Linux distributions' formats are unsupported.
Candlepin maintains subscriptions and channel permissions - within Katello, it is used in order to map software sources imported by Pulp to registered systems.
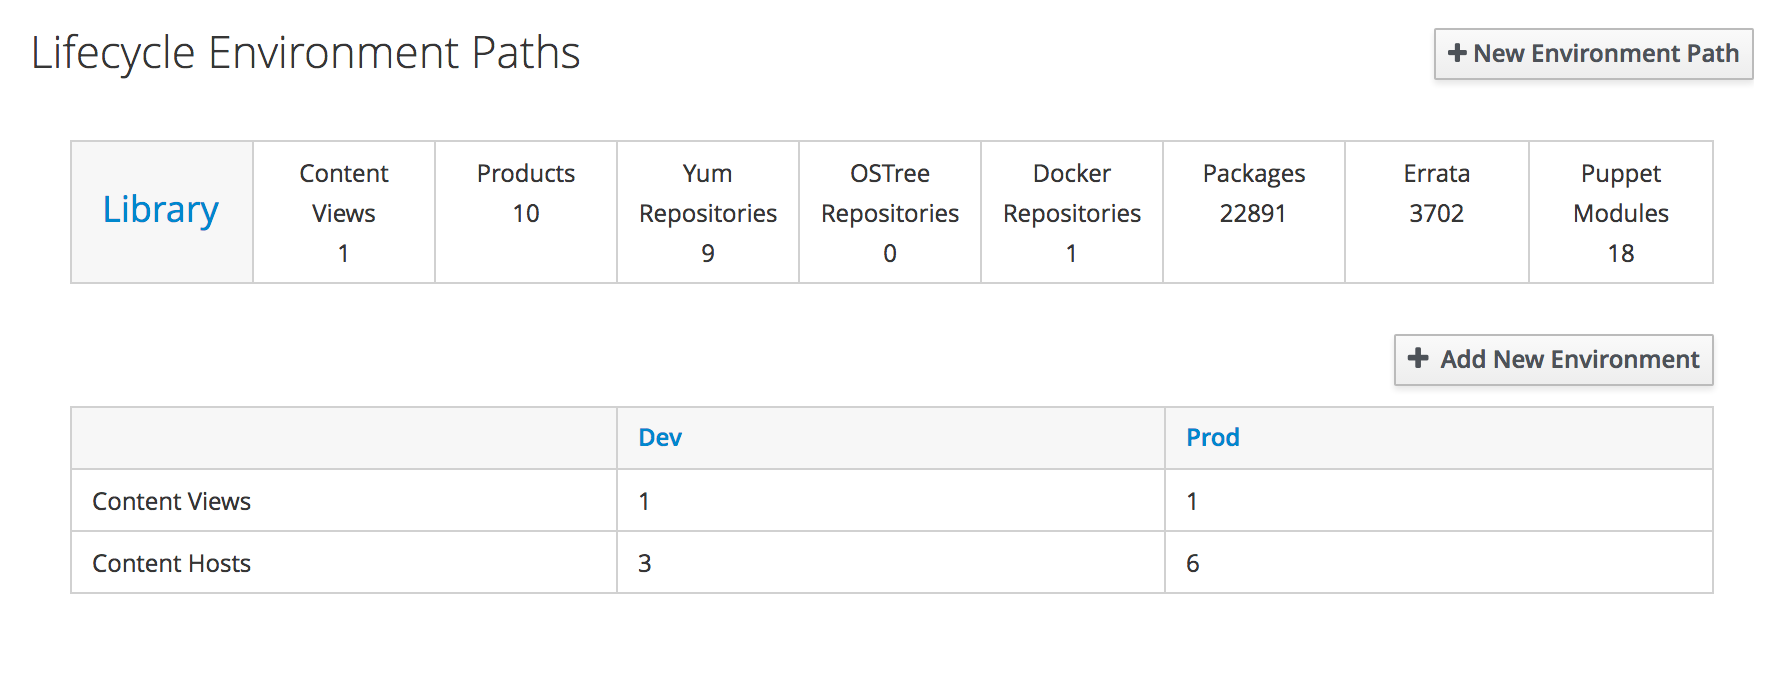
Another feature of Katello is that all content states can be freezed in snapshots. Using this, available updates and Puppet modules can be evaluated and distributed over your system landscape in multiple stages - e.g. the well-known three system landscape concept: development, Test/QA and production. Before installing the latest patches on development machines, you can test them on development and test machines. Using this it is easy to have a validated software version state on all of your systems.
Setup
Normally, a Foreman installation consists of a main instance and at least one Smart Proxy (also called Capsule Server in Red Hat Satellite 6). A Smart Proxy is a Foreman instance, that offers services like:
- Puppet server or Puppet CA
- Pulp server
- TFTP
- DNS
- DHCP
- Out-of-band Management
Additional Smart Proxies are especially used for bigger system landscapes - to name some use-cases:
- Lowering bandwidth problems for distributed system landscapes (e_.g. providing RPM files in decentralized sites_)
- Distributing network services in accordance with the network design (e_.g. custom DHCP server per site_)
- Lowering Foreman system usage (by providing local products per site)
For smaller networks, it might not be necessary to install additional Smart Proxies or Capsule servers. When installing a main instance, a Smart Proxy is installed on the same host. Not all services are mandatory - e.g. it is possible to use pre-existing DHCP and DNS services and TFTP might not be necessary if you don't utilize bare-metal kickstarts.
Requirements
For Foreman and Katello, the following requirements need to be met:
- 2 CPUs
- at least 8 GB RAM (12 GB recommended)
- 30 GB per offered operating system
- 10 GB cache for repository synchronizations (
/var/spool/squid)
It is advisable to create dedicated file systems for the following folders:
/var/lib/mongodb- MongoDB database (software content database)/var/lib/pulp- RPM packages/var/lib/pgsql- PostgreSQL database (main database)/var/spool/squid- Proxy cache
In the Red Hat Satellite 6 installation documentation, it is recommended not to use GFS2, ext4 or NFS for the application file systems because of inode and performance limitations.
Foreman/Katello communicates using the following network ports:
- http/https for administration and kickstart/package download
- tcp/5647 for client management
- tcp/9090 for Smart Proxy communication
Installation
Basically, Foreman supports the following Linux distributions for installation:
- EL7 (Red Hat Enterprise Linux, CentOS, Scientific Linux)
- Debian 8
- Fedora 24
- Ubuntu 14.04 and 16.04
For RPM-based distributions there are YUM repositories available for the x86_64 architecture - for Debian-based software sources are also available for i386, armhf and aarch64.
If you plan to utilize Katello as well, you should keep in mind that software packages are only pre-compiled for EL7 and the x86_64 architecture. Using other architectures will require to compile the software on your own.
Depending on your file system, it might be advisable to utilize LVM:
 1# pvcreate /dev/sdb
 2# vgcreate vg_katello /dev/sdb
 3# lvcreate --name lv_squid --size 10G vg_katello
 4# lvcreate --name lv_mongodb --size 10G vg_katello
 5# lvcreate --name lv_pulp --size 30G vg_katello
 6# lvcreate --name lv_pgsql --size 10G vg_katello
 7# mkfs.xfs /dev/mapper/vg_katello-lv_squid
 8# mkfs.xfs /dev/mapper/vg_katello-lv_mongodb
 9# mkfs.xfs /dev/mapper/vg_katello-lv_pulp
10# mkfs.xfs /dev/mapper/vg_katello-lv_pgsql
Ensure to add entries for the new file systems into the /etc/fstab file in order to enable auto-mount at boot time:
1# vi /etc/fstab
2...
3
4/dev/mapper/vg_katello-lv_squid    /var/spool/squid    xfs  defaults        1       2
5/dev/mapper/vg_katello-lv_mongodb       /var/lib/mongodb        xfs    defaults        1       2
6/dev/mapper/vg_katello-lv_pulp  /var/lib/pulp   xfs    defaults        1       2
7/dev/mapper/vg_katello-lv_pgsql  /var/lib/pgsql   xfs    defaults        1       2
8
9ESC ZZ
Afterwards, the required directories are created, the SELinux context is reset and the partitions are mounted:
1# mkdir -p /var/lib/{mongodb,pulp,pgsql} /var/spool/squid
2# restorecon -Rv /var/lib/{mongodb,pulp,pgsql} /var/spool/squid
3# mount -a
Before starting the installation, it is advisable to open required ports in the firewall:
1# lokkit -s ssh
2# lokkit -s http
3# lokkit -s https
4# lokkit -p 5647:tcp
If you are also planning to utilize additional Smart Proxies, open another port:
1# lokkit -p 9090:tcp
The required software repositories vary depending on your Linux distribution and version - detailed information can be found in the official documentation. For EL7, the following commands need to be entered:
1# yum -y localinstall http://fedorapeople.org/groups/katello/releases/yum/3.3/katello/el7/x86_64/katello-repos-latest.rpm
2# yum -y localinstall http://yum.theforeman.org/releases/1.14/el7/x86_64/foreman-release.rpm
3# yum -y localinstall https://yum.puppetlabs.com/puppetlabs-release-pc1-el-7.noarch.rpm
4# yum -y localinstall http://dl.fedoraproject.org/pub/epel/epel-release-latest-7.noarch.rpm
5# yum -y install foreman-release-scl
Install all required software packages by entering:
1# yum -y install katello
Before running the installation, it is a good idea to have a look in the installation utility documentation. The installation process is fully automated and offers a lot of parameters:
1# foreman-installer --scenario katello -h
For me, the parameters --foreman-initial-organization and --foreman-initial-location were mandatory as the control names of the first organization and location - specifying them can override default values (Default organization, Default location).
Before starting the installation it is advisable to create a snapshot or backup. In case of any issues, it is easy to return to that state without the need to focus on debugging.
After the installation, the administrator initial password is printed - it is advisable to change this as soon as possible:
 1# foreman-installer --scenario katello --foreman-initial-organization "Stankowic development" --foreman-initial-location "Homelab"
 2...
 3  Success!
 4  * Katello is running at https://st-katello01.stankowic.loc
 5      Initial credentials are admin / X!g1327z_rulz
 6  * To install additional capsule on separate machine continue by running:
 7
 8      capsule-certs-generate --capsule-fqdn "$CAPSULE" --certs-tar "~/$CAPSULE-certs.tar"
 9
10  The full log is at /var/log/foreman-installer/katello.log
11
12Afterwards, the Foreman user interface can be accessed using the URL https://hostname-oder-FQDN.
The next part of this article series will focus on products, repositories and content views.