System management with Foreman/Katello - Part 2: Products, Repositories and Content Views
The last post of this series introduced the software projects Foreman and Katello. If you followed the instructions, you were able to login to a fresh Foreman installation.
In this part, the new installation is filled with live: first software contents are added to deploy and manage systems later.
If you already had a chance to work with Spacewalk (which was the upstream project for the previous Red Hat Satellite major version) might be puzzled by the new terms that are used within Katello:
- Repository
- GPG ley
- Product
- Content View
- Composite Content View
- Lifecycle Path
Repository
Let's explain them bit by bit. The first term in this list might be self-explanation: Repository. A repository mostly stands for a YUM mirror, something like:
http://mirror.centos.org/centos/7/updates/x86_64/
In this example you will find all CentOS 7 updates for the x86_64 architecture. Keep in mind that Katello not only allows YUM repositories - Docker, Puppet and conventional file repositories are also possible. In other words: you can also distribute Docker and Puppet modules - we will focus on this in a later blog post. Debian packages are not officially supported yet - but it is planned to change this; there is already an implementation in progress (ATIX AG is major contributor). So it is quite realistic that Katello will also be able to maintain Debian and Ubuntu systems in near future.
GPG key
If you ever imported a YUM repository, you already know that they are mostly signed. Therefore, it is required to import a key before the first use:
1# yum install foobar
2...
3Importing GPG key 0x0608B895:
4 Userid: "EPEL (6) <epel@fedoraproject.org>"
5 From : http://download.fedoraproject.org/pub/epel/RPM-GPG-KEY-EPEL-6
6Is this ok [y/N]:
Within Katello, GPG keys are created per repository so that packages can verified before importing them. In addition to that, systems installed by Foreman can import the required keys enabling automatic package installation.
GPG keys are maintained via the web interface below the menu Content > GPG Keys, they can be used for multiple repositories.
Product
A product basically consists of the following three elements:
- Repository
- GPG key
- Synchronisation plan
It makes sense to group associated software content in a product - e.g. the operating system and all dependent repositories (updates, extras, source codes,...). The synchronisation plan defines how often content updates are downloaded. Beside a time frame, it is also possible to define whether synchronisation should perform weekly, daily or hourly.
During product creation, available repositories can be discovered automatically after specifying the YUM mirror - this feature is called Repo Discovery.
Products are defined within the web interface below the menu Content > Products.
An example for a valid product definition:
- Product: CentOS 7 x86_64
- GPG key: http://mirror.centos.org/centos/RPM-GPG-KEY-CentOS-7
- Repositories:
- OS: http://mirror.centos.org/centos/7/os/x86_64/
- Updates: http://mirror.centos.org/centos/7/updates/x86_64/
- Synchronisation: daily, 03:00am
Content View
A Content View (CV) represents a snapshot that can include the following:
- YUM repositories and filter
- Puppet modules
- Docker and OStree content
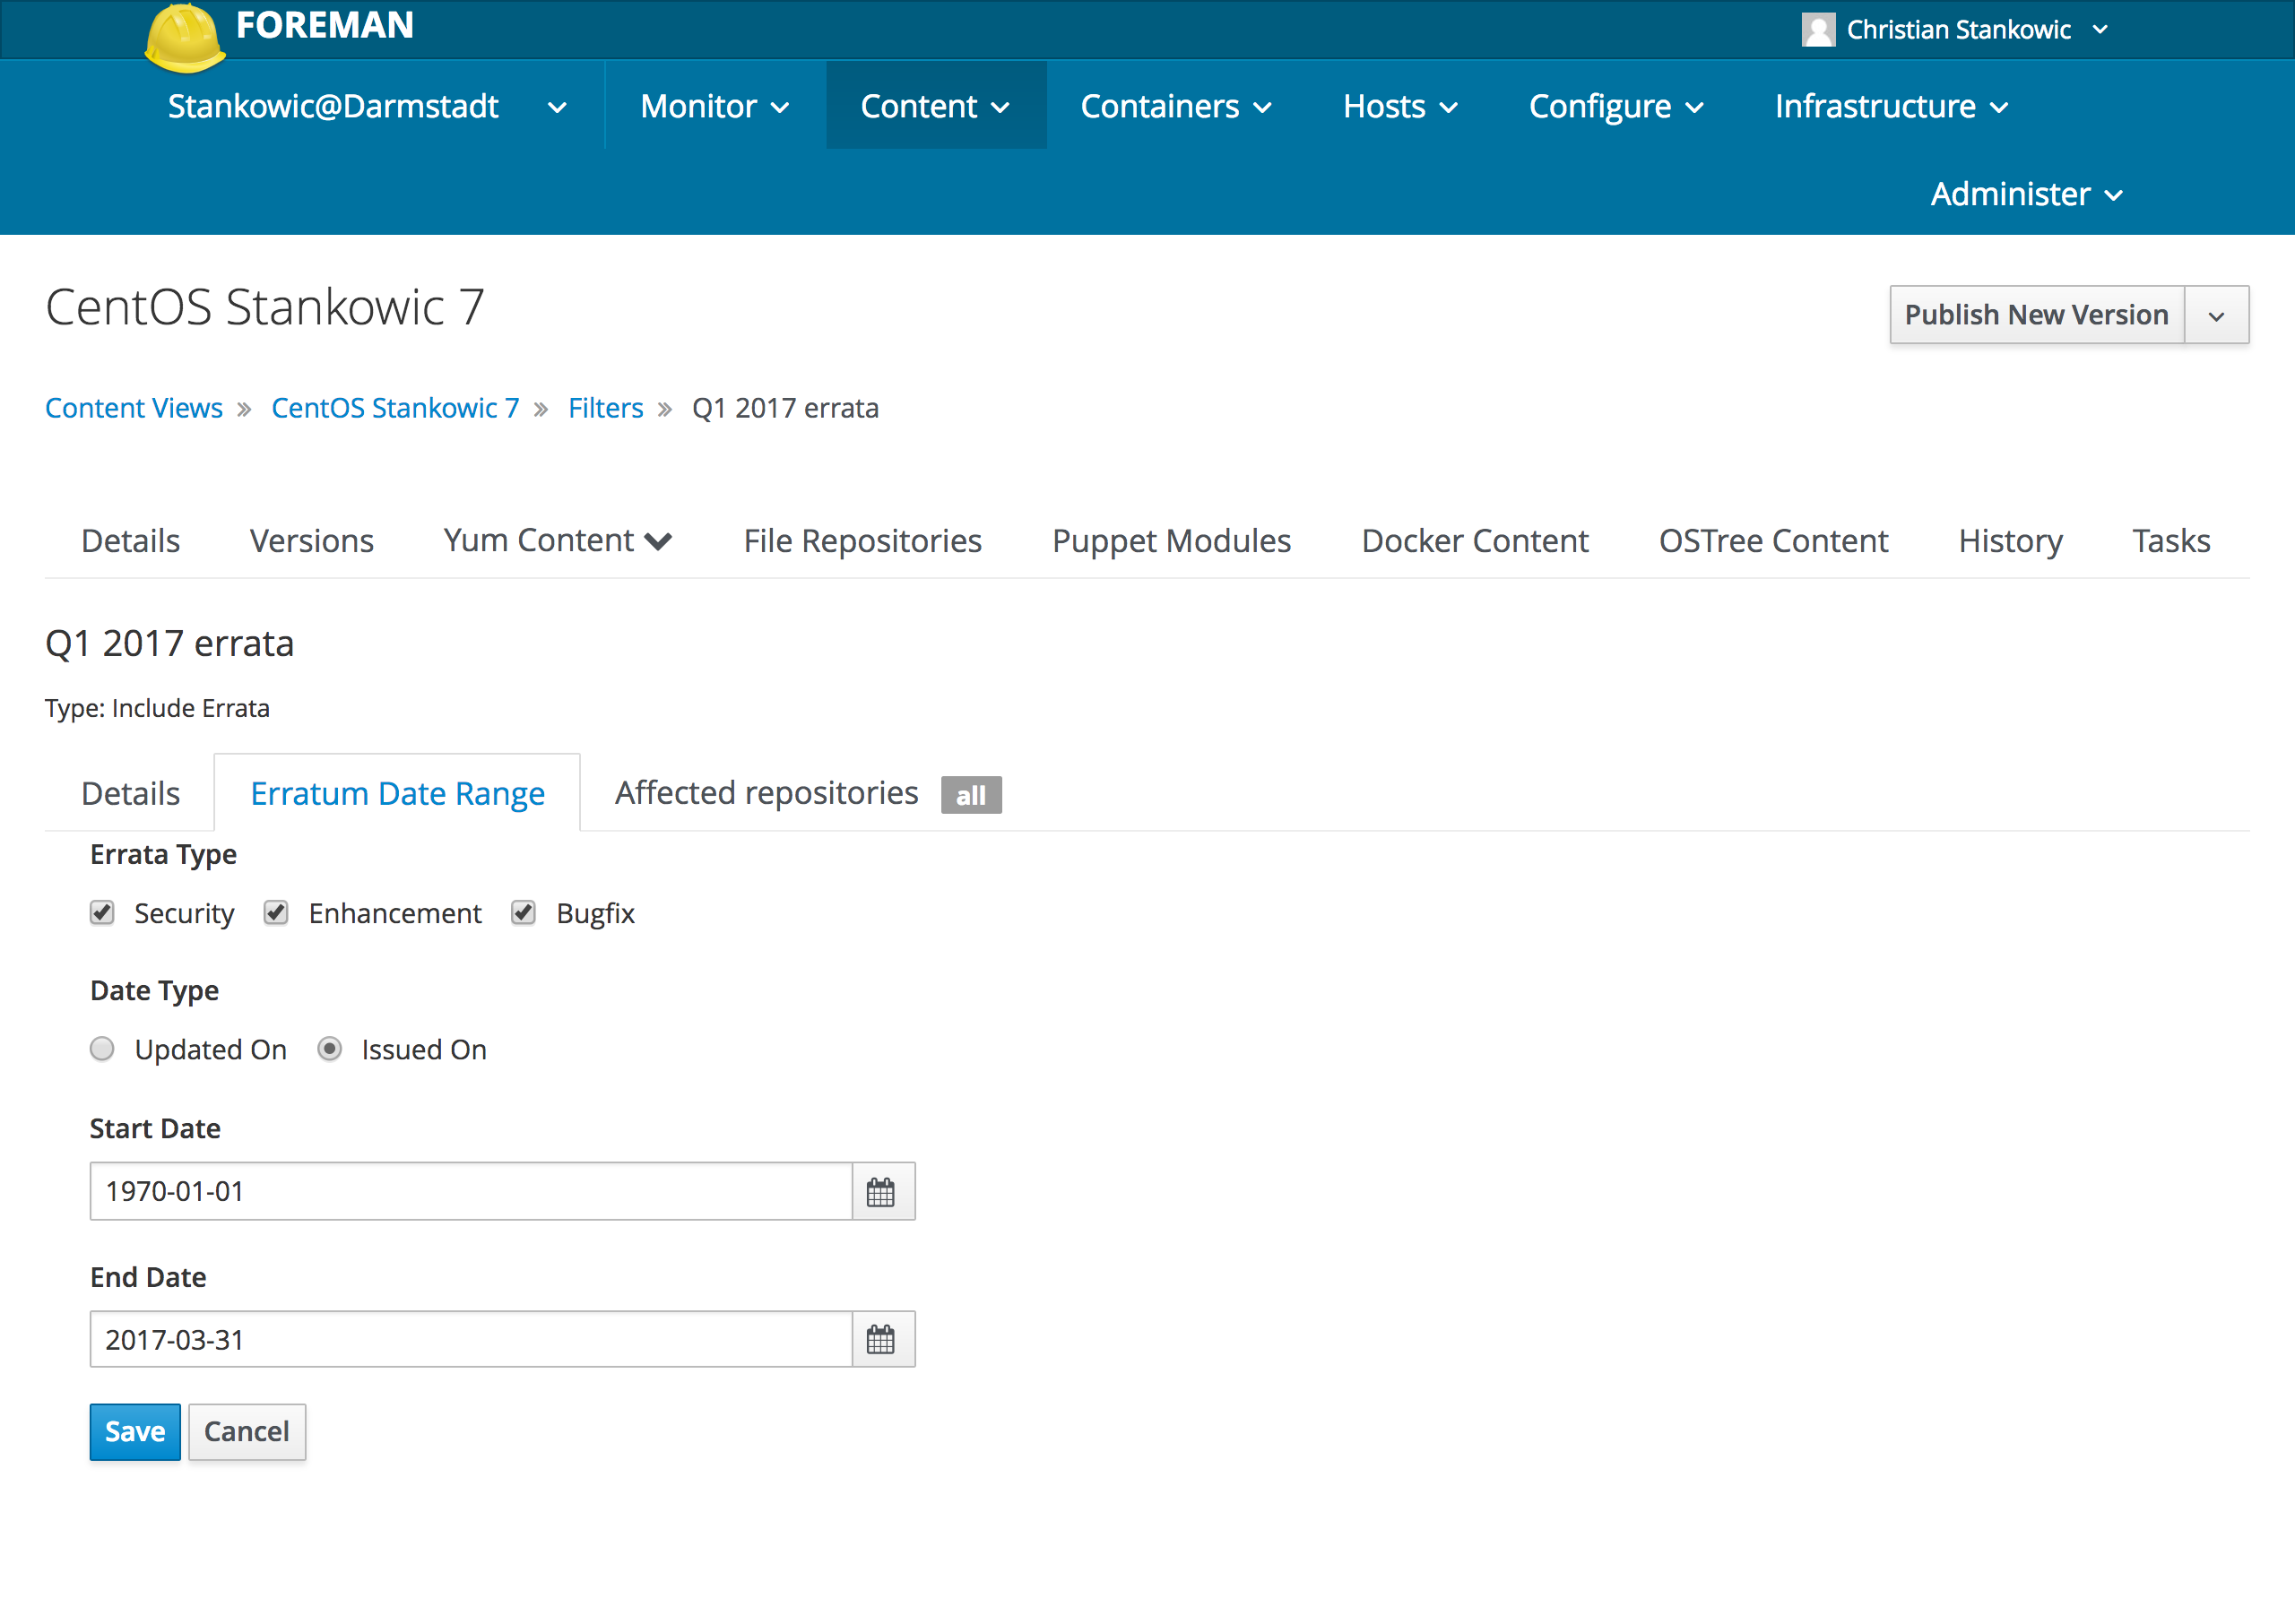
YUM filter help with including or excluding packages by means of the certain criteria such as:
- Name
- Package group membership
- Errata ID, date or type
Especially the last filters can be of major interest - e.g. if systems must only be updated quarterly. Using this filter, updates can be "freezed" to a particular date so that only package updates that have been released in this time frame can be installed. Another example would be excluding development utilities per definition on production machines.
Content Views are released in versions - a version includes the summary of all packages that were available during creation. On the other hand, this also means that Content Views need to be updated if recently added packages should be integrated. This is huge difference in comparison with Spacewalk where imported packages were available immediately. It might sound confusing - but this change totally makes sense in the section after next - I promise! 🙂
If you want to automatically update some CVs (e.g. nightly for development machines), you can automate this using the hammer cli or katello-cvmanager.
When publishing new versions, comments can assist with following changes - which is mandatory for bigger environments. If colleague A is wondering about plenty of new packages in a CV, a hint "Product XYZ added" by colleague B might be very helpful.
Once a CV version was saved, it can be presented to a Lifecycle Environment - more on that later.
Composite Content View
A Composite Content View (CCV) is a combination of multiple Content Views. This mostly applies to bigger setups in order to increase clarity and reduce maintenance overhead. Using this, it is possible to create CCVs that include all necessary operating system and application repositories per function and host. If operating system and application are updated in independent cycles (e.g. application is updated faster/more frequent than operating system), maintaining CCVs can be very valuable.Another use case could be that operating system and application maintenance is done by different teams.
The following graphics show the differences between conventional CVs and CCVs in an environment with the following products:
- Operationg system: CentOS 7
- Applications: App1, App2, App3
Operating system and applications are updated independently. Some systems host an application, some not.
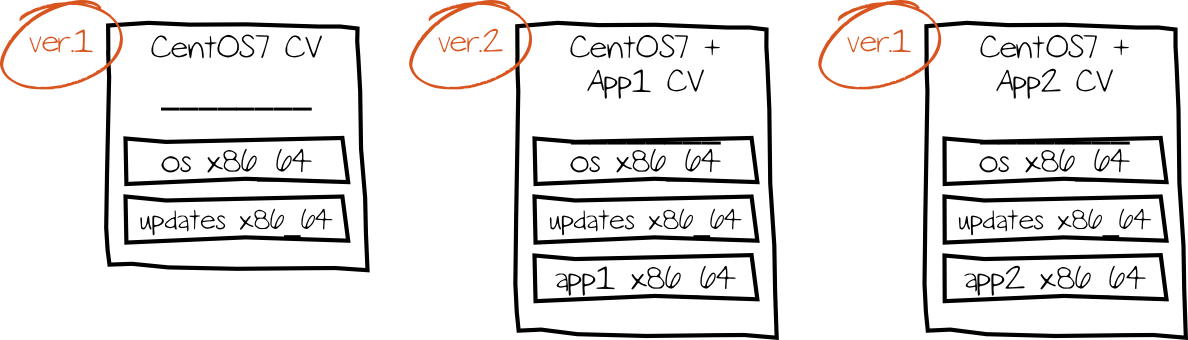
With conventional CVs it quickly figures out, that this means more maintenance effort. Per application dedicated CVs need to be created - every CV also contains the operating system product. Because operating system and applications are updated independently, this results in more CV version updates. If the operating system is updated, it is important to keep in mind that all other application CVs (App1, App2, App3) also needs to be updated as they also contain the operating system product.
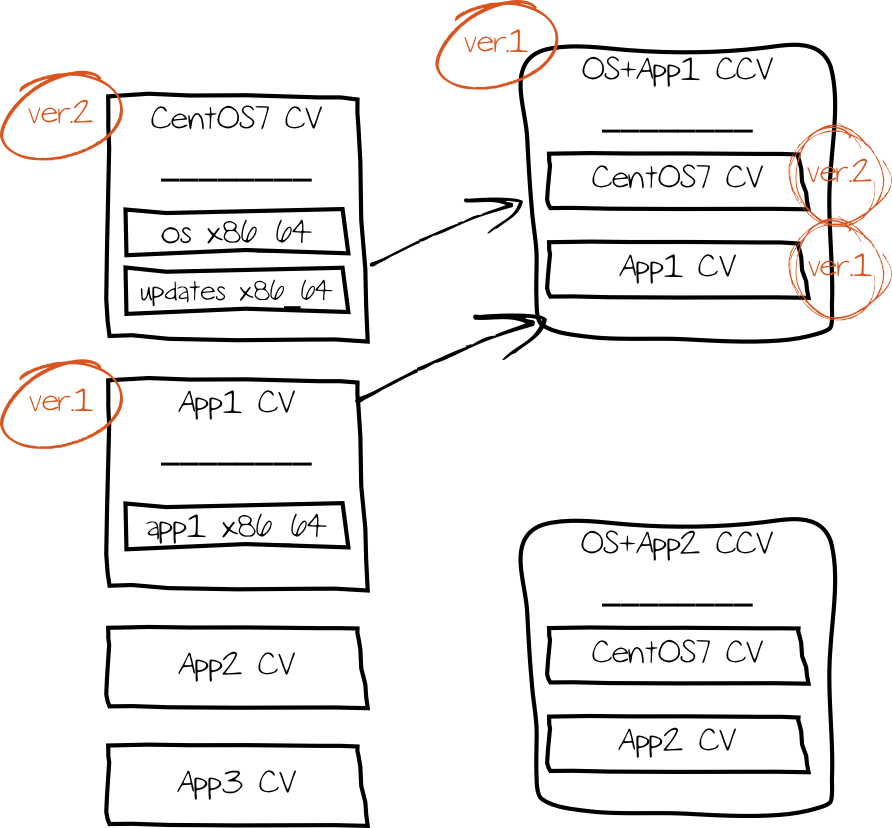
With coming CCVs into picture, this maintenance effort can be reduced. In this case, CVs are maintained per operating system and application; those can be updated independently - also from different teams. Operating systems and applications are linked in a CCV - it is also possible to refer to specific CV versions. In other words: it is possible to combine a newer application CV version with an older operation system CV version. If one of the referred CVs is updated, the effort to update the CCV is significantly lower im comparison to conventional CVs (see above).
Lifecycle Environments and Path
In my opinion, another benefit in comparison with Spacewalk is the implementation of Lifecycle Paths and Environments. Systems can be grouped by their purpose - the following three-system-landscape is quite common and can be represented perfectly with Lifecycle Environments:
- Development (Dev)
- Quality assurance (QA)
- Production (Prod)
Keeping the example from above in mind and thinking about adding recent package updates, leads into a new use case. Usually, new patches should not be available to all systems in the first place. It is a good idea to test them on development and QA systems before installing them on production systems - otherwise, things could get horribly wrong.
A Lifecycle Path describes the sequence in which CV updates are released ("promoted") - e.g. for the previous example:
- Dev
- QA
- Prod
Using the web interface, this order needs to be obeyed; when using the command-line utility hammer, this order can be bypassed.
It is possible to define multiple Lifecycle Environments and Paths - e.g., if you need to maintain multiple applications with different staging environments.
Example: CentOS 7
Time to turn theory into effective practice. In this example, all the necessary preparations to deploy CentOS 7 along with an application requiring the PostgreSQL 9.6 database will be done. As CentOS 7 only offers version 9.2 of the PostgreSQL database, a third-party repository needs to be added.This process should undergo the entire Lifecycle Paths Dev, QA and Prod. To summarize, we need:
- Lifecycle Paths Dev, QA and Prod
- Synchronisation plan
- CentOS 7 product including GPG key, repositories and CV
- PostgreSQL 9.6 product including GPG key, repository and CV
- application CCV of both products
- promote CV and CCV verions
The first step is to create Lifecycle Paths - move to the menu Content > Lifecycle Environments. By clicking Add New Environment, a dialog is opened; fill it like following:
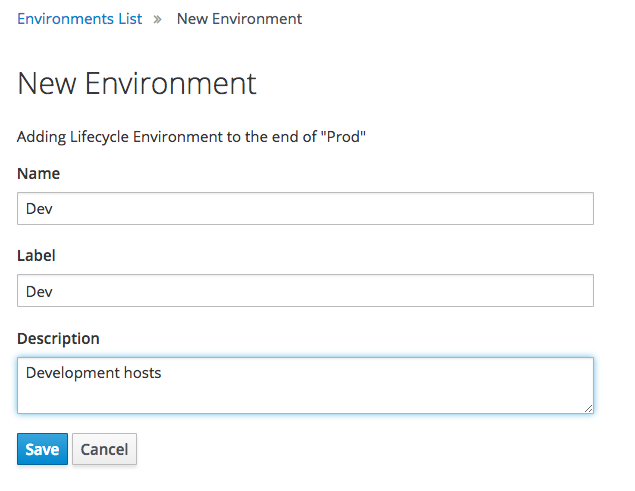
- Name: environment name
- Label: appropriate internal name
- Description: short description
For Dev, QA and Prod, appropriate LIfecycle Environments are created.
The next step is to create GPG keys - move to the menu Content > GPG Keys. Open the next dialog by clicking Create GPG Key:
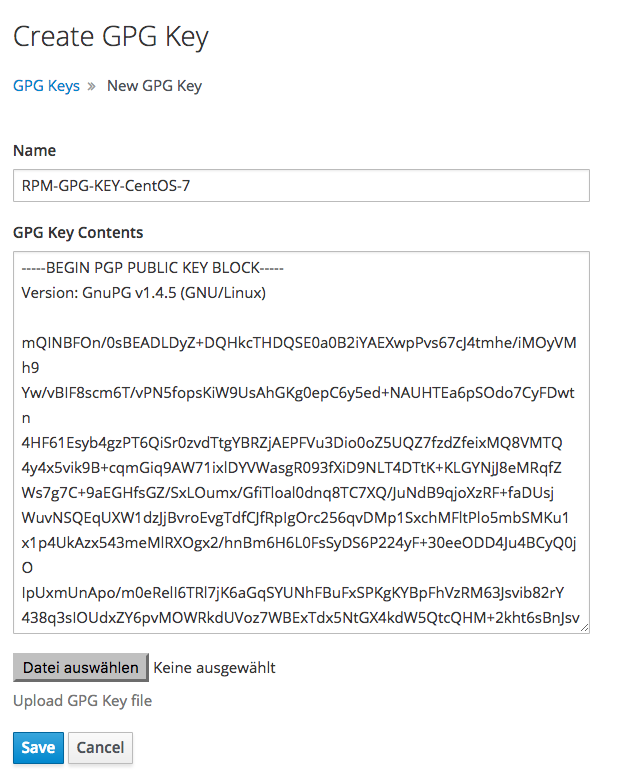
- Name: GPG key name, might want to pick file name
- GPG Key Contents: GPG key content
Alternatively, you can also upload a GPG key as file.
For this example, the following two GPG keys are needed:
- http://mirror.centos.org/centos/RPM-GPG-KEY-CentOS-7
- https://download.postgresql.org/pub/repos/yum/RPM-GPG-KEY-PGDG-96

To enable Foreman respectively Katello to automatically download packages, synchronisation plans are needed. To start the appropriate assistant, click Content > Sync Plans > Create Sync Plan. Enter the following information:
- Name: Rule name
- Description: Short description
- Interval: hourly, daily or weekly
- Start Date: Date the rule will be activated
- Start Time: Execution time
Afterwards, products are created. To avoid the need of defining repositories manually, we will leverage the Repo Discovery functionality. Clicking Content > Products > New Product will start the assistant. This time, enter:
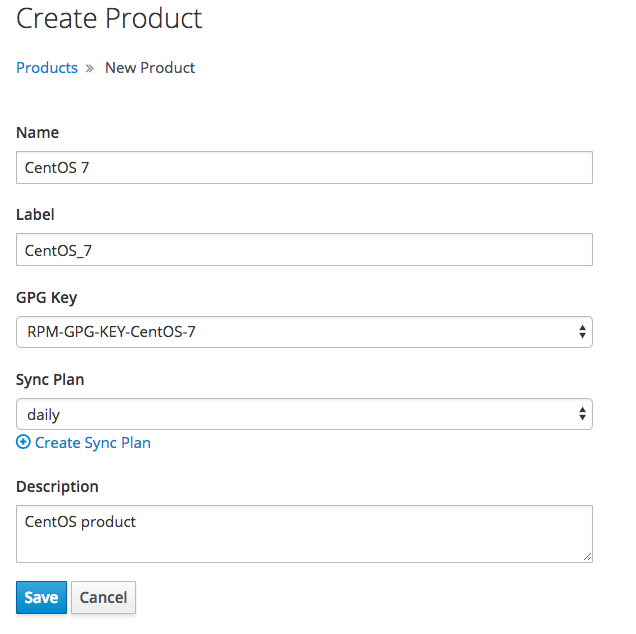
- Name: Product name
- Label: Appropriate internal name
- GPG Key: GPG key just created
- Sync Plan: Synchronisation plan just created
- Description: Short description
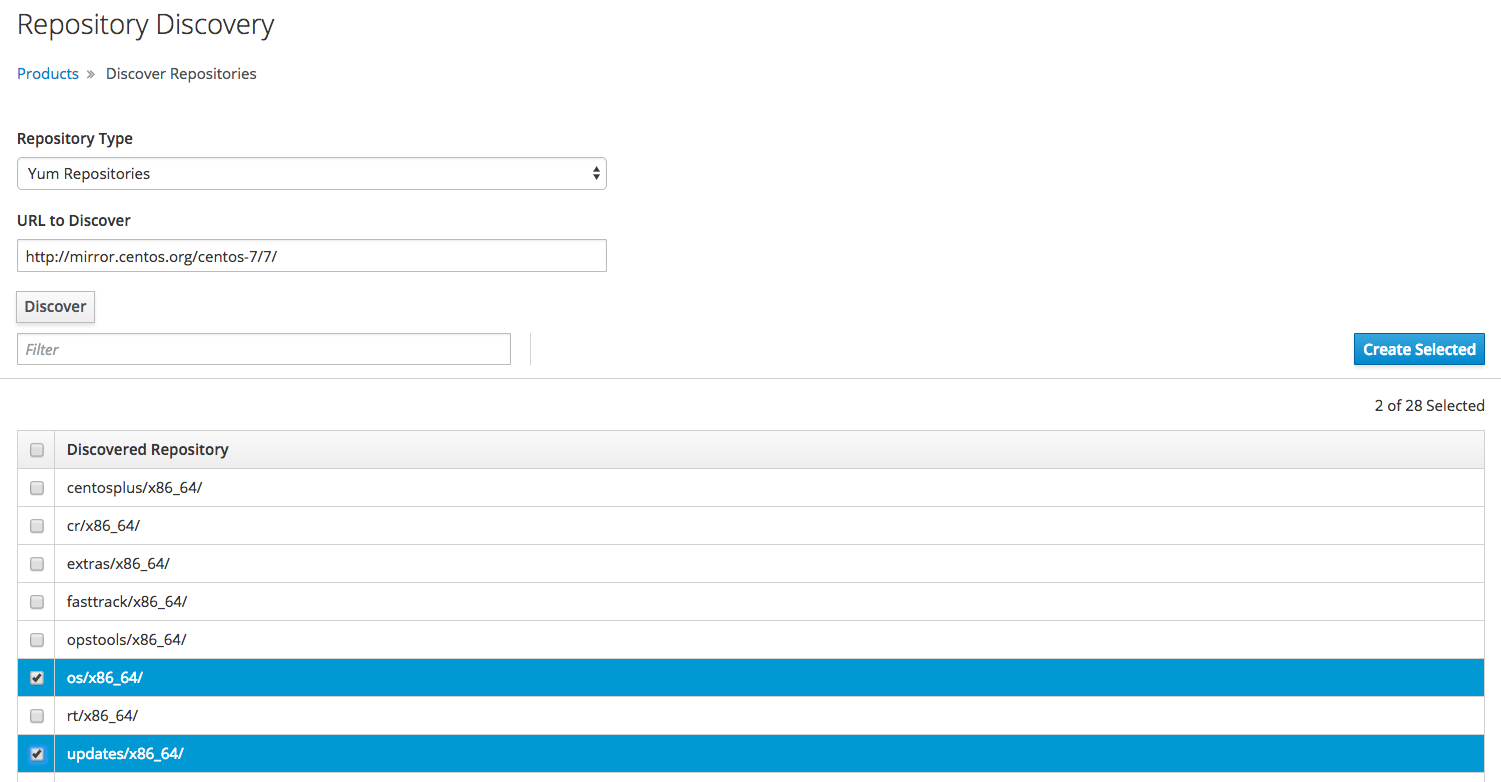
In the next step, repositories can be added to the product. By clicking New Repository, they could be created in a manual manner. könnte man manuell diese manuell anlegen. To browser a mirror recursively for repositories, start the appropriate assistant by clicking Content > Product > Repo Discovery. Especially, this is quite useful when multiple YUM repositories are on one server and you only need some of them - e.g. like for the CentOS repositories. Fill the dialog like this:
- Repository Type: Yum Repositories
- URL to Discover: search entry point, in this case http://mirror.centos.org/centos-7/7/
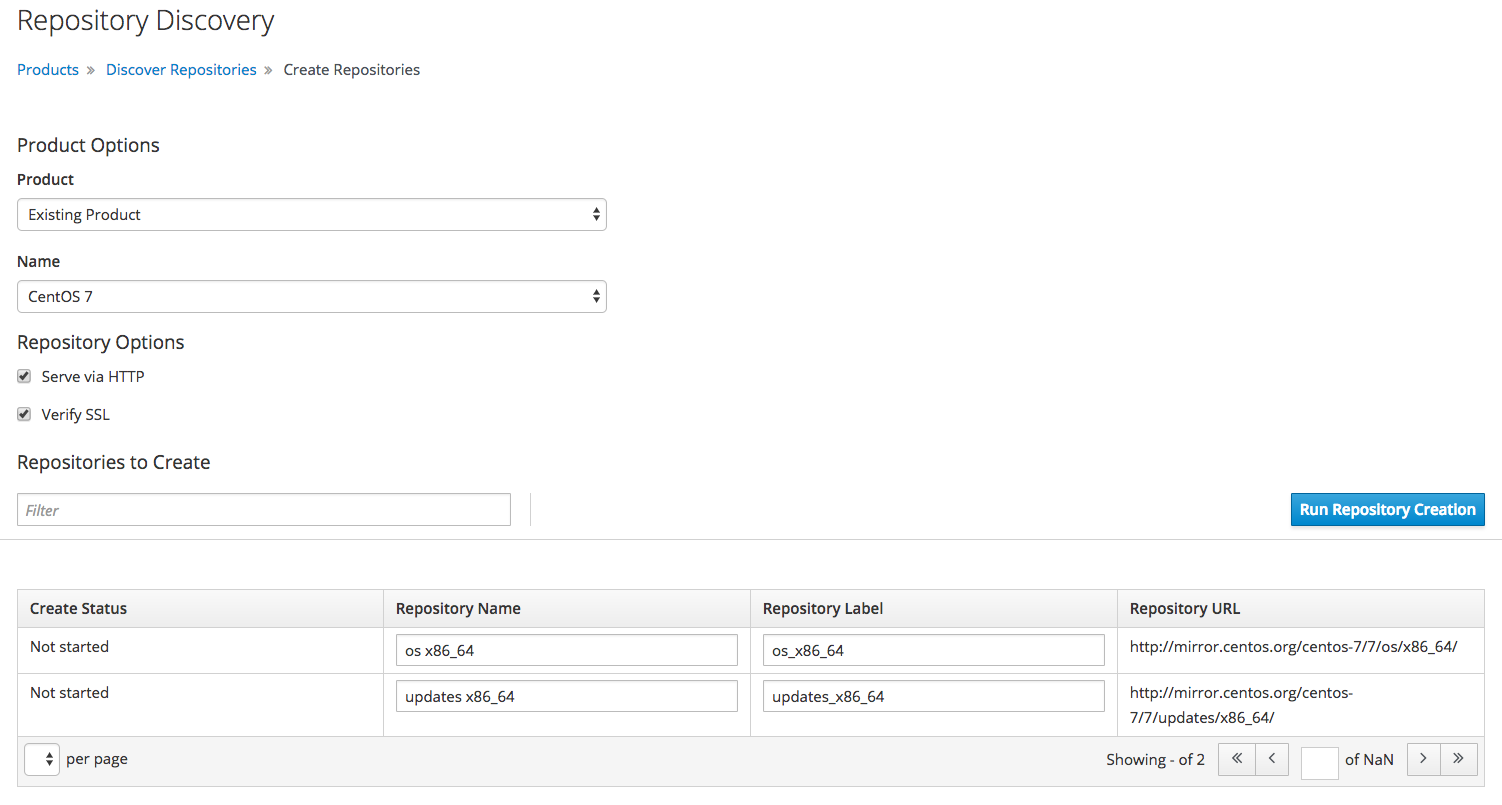
By clicking Discover, search is started; afterwards detected repositories can be checked and assigned to the product just created by clicking Create Selected. Keep in mind to check the option Existing Product and select the appropriate product:
Now, a first CV on product base can be created: Content > Content Views > Create New View; enter:
- Name: CentOS
- Label: generated automatically
- Description: CentOS product
- Composite View: No
By clicking Save all available repositories are listed automatically. Check the CentOS repositories and click Add Repositories. Afterwards, a new CV version can be stored by clicking Publish New Version - after entering an optional description click Save.
Beside CentOS, another product for PostgreSQL is needed - click Content > Product > Create Product again. This time, the required repository is created manually. After clicking New Repository, the form is filled as follows:
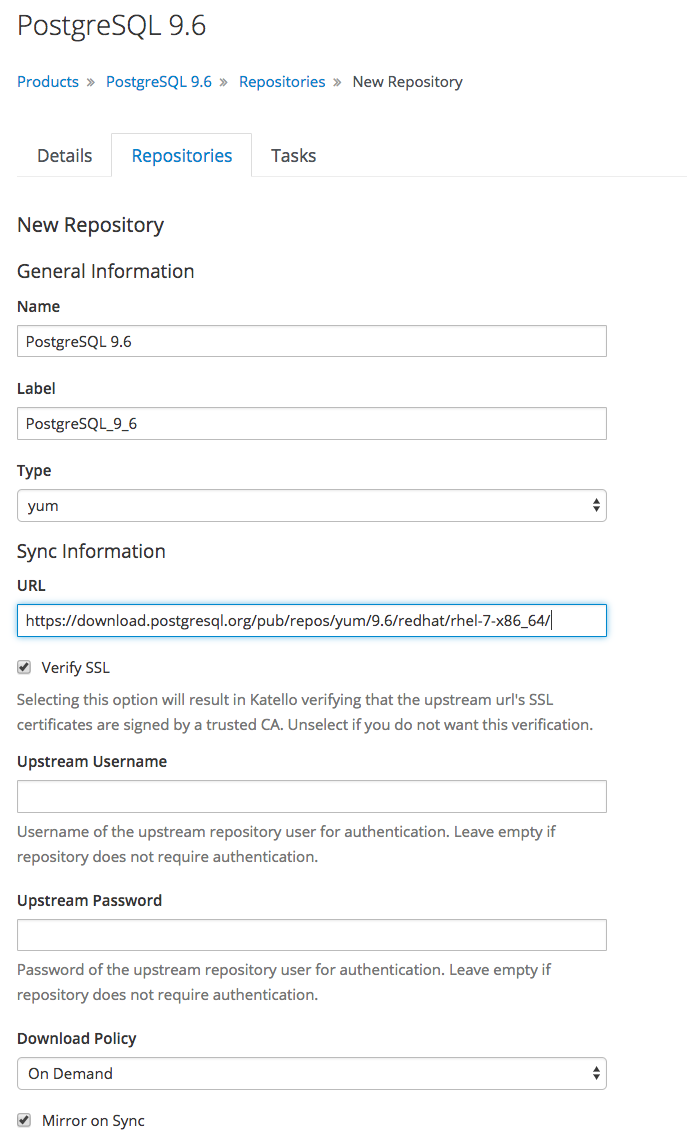
- Name: PostgreSQL 9.6
- Label: generated automatically
- Type: yum
- URL: https://download.postgresql.org/pub/repos/yum/9.6/redhat/rhel-7-x86_64/
- Download Policy: On Demand
- Mirror on Sync: yes
Foreman offers three different download policies:
- Immediate: Metadata and packages are downloaded immediately
- On Demand: Metadata is downloaded immediately; packages are downloaded when a client requests them (default)
- Background: Metadata is downloaded immediately; packages are downloaded in the background
Specifying the GPG key is optional here as we already supplied the key at product level.
The option Mirror on Sync can be helpful for repositories that often update program versions and remove old versions completely. In other words: removed outdated packages are also removed locally.
Another CV is required for PostgreSQL - repeat the steps above for this product.
At least, a CCV combining both CVs is . created - Content > Content View > Create New View:
- Name: CentOS + PGSQL 9.6
- Label: generated automatically
- Description: CentOS and PostgreSQL 9.6
- Composite View: Ja
After creating the CCVs, make sure to pick it from the list. Click Content Views > Add to see available CVs that can be added. In this example, the two available CVs are selected. Click Publish New Version to start the assistant for publishing new versions.
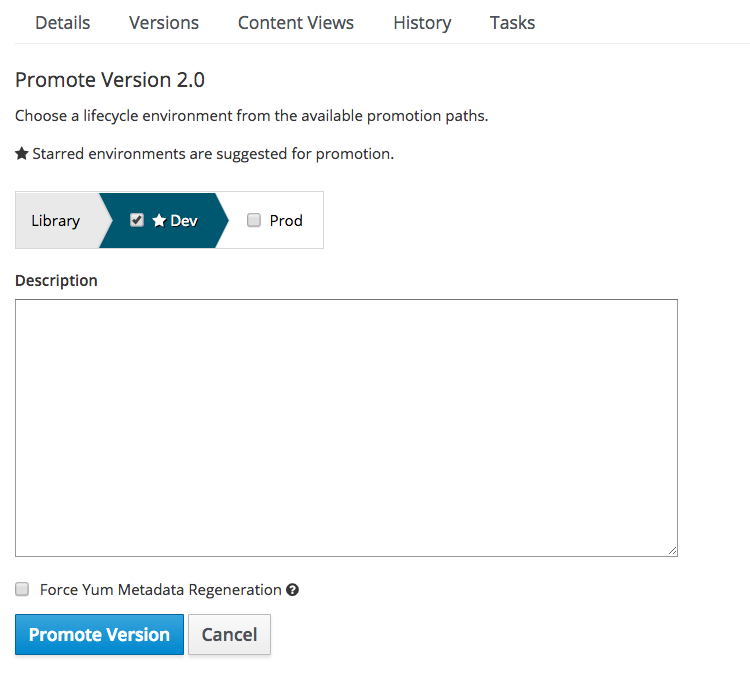
Yay! The last step is to present the new version to the appropriate Lifecycle Environments. To manage this, click Promote - in the dialog, select the appropriate environment. Repeat this step for every environment stage. 🙂
The next part of this post series will focus on creating and maintaining the first host.