Test-driven development with Chef and Vagrant
When it is planned to automate deploying and configuring complex insfrastructure setups, Chef is a mighty tool. Focussing the Infrastructure as Code (IaC) manifesto, it offers more than conventional Configuration Management and can be used to replace manual tasks with faster, repeatable and measurable automatisms. When developing these automatisms, Vagrant is often used to deploy temporary VM instances hypervisor independently in an automated fashion.
In the next sections you will see what test-driven development (TDD) means in this context and how you can leverage the mentioned tools. 🙂
Scenario and basics
Before focussing on theory, I want to describe an example scenario.
In this post, we will focus on automating the deployment of web servers. In general, the following sub tasks should be automated:
- Deploying new CentOS VMs
- Installing Apache web server
- Configuring and starting the service
- Deploying content
Infrastructure as Code
To be honest, the sub tasks mentioned above are trivial - they could also be automated using a script. But in this case, we would miss keeping versioning, measurability und reproducability in mind.
Let’s say we have provisioned 500 web servers successive using a script. Now, there is a change in the software set and new servers are provisioned with additional software packages. Old systems are not affected by this and therefore a new mechanism needs to be found to update the old hosts. Conventional scripts are evaluated in a sequal manner, potential errors need to be kept in mind to define exceptions. With coming measurement into picture, conventional scripts are also disadvantageous as they would simply repeat all actions (in this example, a web server might be reinstalled) instead of repeating relevant actions keeping their context in mind.
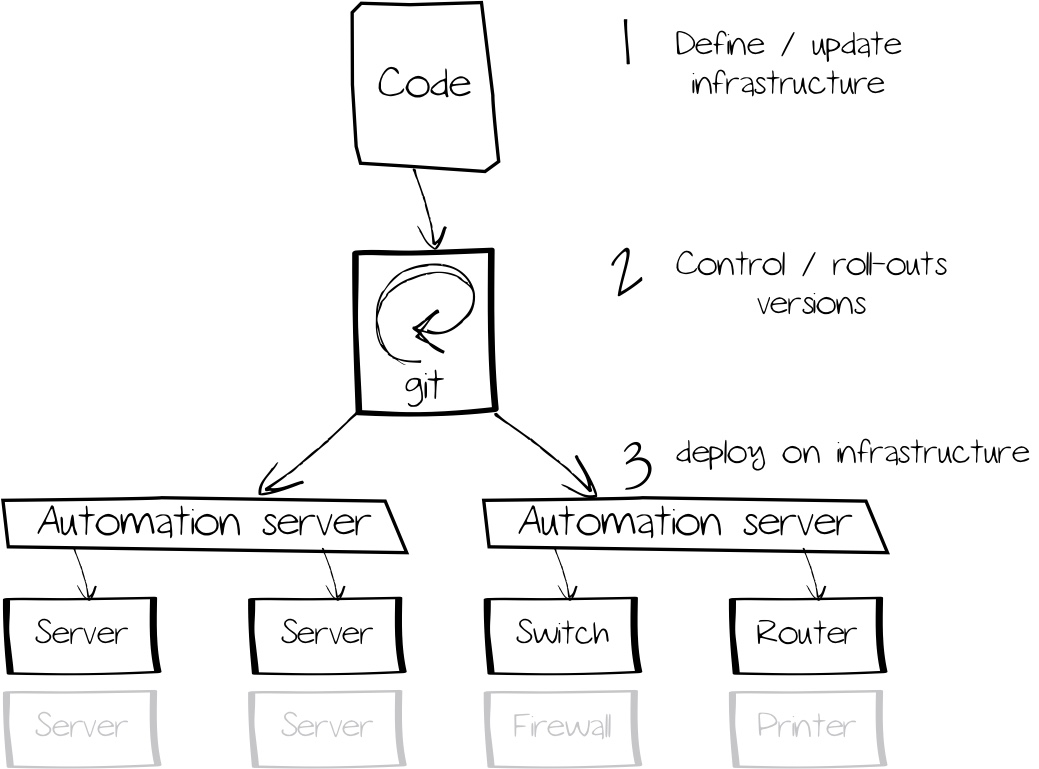
The benefit behind IaC is to define infrastructure resources using machine-readable files. Configuring and managing these resources can be done by intelligent software solutions. By leveraging versions and test catalogs, also complex infrastructure scenarios can be crafted in an automated manner. As the whole infrastructure is defined as code, previous (checked) versions can be restored easily.
For this, IaC leverages techniques proved in software development, such as git for version management or test-driven development.
Test-driven development
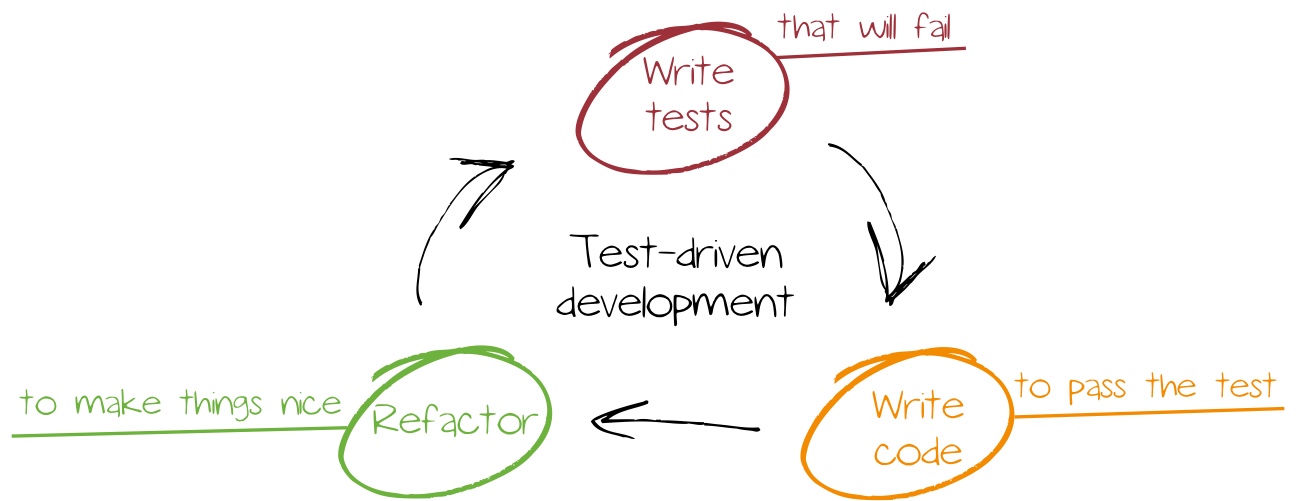
Test-driven development is a method which is used often primarily in agile software development, but also gets used moreoften for infrastruture topics. During software development, it is essential to validate code functionality and requirement coverage by checking defined tests.
When practicing test-driven development, tests are consequently defined before actually creating the code, while other methods such as waterfall would define tests during or after development. Using this early test definition state omitting tests or reducing test criteria to match development goals is prevented. In addition, forgetting test case creation is impossible.
Continuous investigation and optimisation is another important attribute. Usually, first iterations cover basic tests and code, while additional iterations might add further functionality and tests.
Infrastructure deployments benefit from this procedure: using clearly defined target situations it is guaranteed that developed automatisms are only considered completed if all criteria is coverd. By leveraging test cases, also existent systems can be checked and converged if required - e.g. after an iteration that includes new functionality. Especially bigger system landscapes benefit form this. While smaller environments with less servers can be managed in an manual manner, this is impossible for setups with hundreds of servers.
Chef
Chef is an automation platform that allows not only covering configurations, but also complete infrastructure scenarios in code. The list of supported resources is long; beside classical operating system components (files, packages, users,...) also whole cloud ressources (AWS workloads, Azure VMs,...) can be managed. On GitHub, there is a collection of additional extensions.
Chef is agent-based; managed entities (server, storage, cloud resource) require a client software for chef server communication or - optionally - serverless catalog enforcement. The following plattforms are supported:
- IBM AIX
- Debian and Ubuntu
- Red Hat Enterprise Linux and binary-compatible alternatives such as CentOS
- Apple macOS
- SUSE Linux Enterprise and openSUSE
- Oracle Solaris
- Microsoft Windows
Within Chef, configuration logic is bundled in a cookbook - this includes:
- Recipes - Collection of resources and their specifics for configuration
- Attribute - user-defined variables for controlling recipes without actually changing the code
- Files and templates - static file or configuration file templates
In comparison with other Configuration Management tools such as Puppet, Chef leverages plain, unchanged Ruby.
Beside the Chef agent, the Chef Workstation also bundles the following additional programs to simplify development:
- Berkshelf - Managing dependencies (e.g_. other cookbooks_)
- Cookstyle - Tool for checking source code style
- Foodcritic - Static code analysis
- Test Kitchen - Integration test utility that checks cookbooks on multiple platforms (e.g. different operating systems)
- Inspec - Framework for auditing applications and infrastructure, target/performance analysis
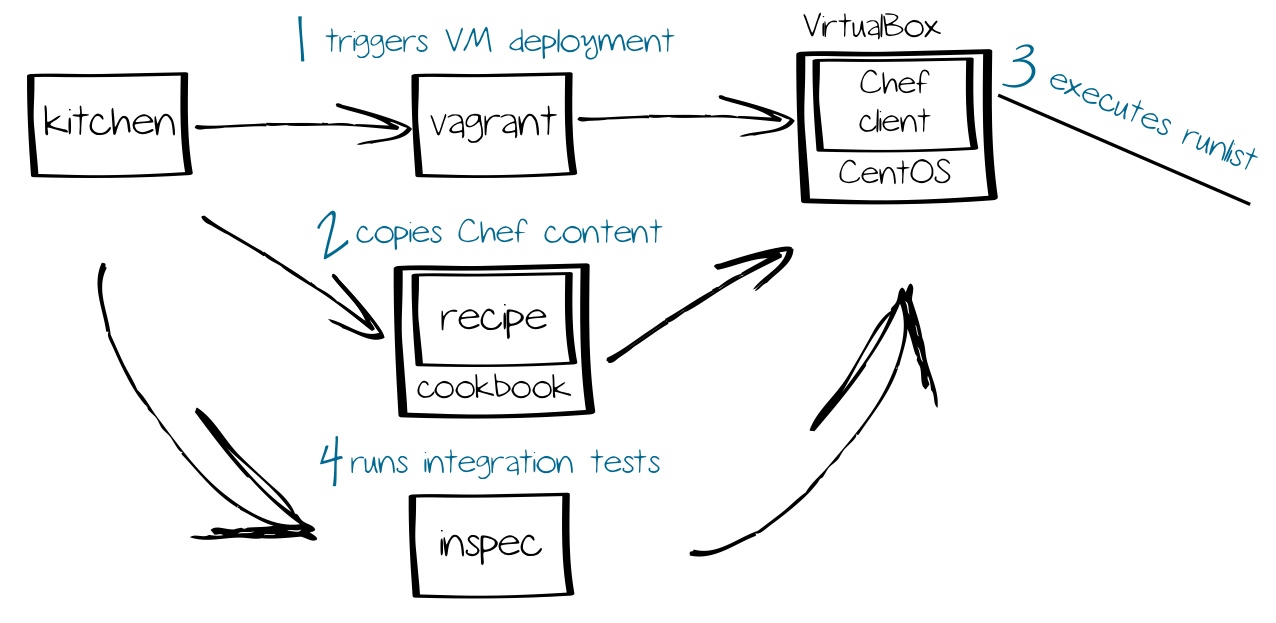
Especially Test Kitchen is a very handy tool in combination with Vagrant, Chef and Inspec. In this scenario it is used to deploy VMs to test in an automated manner with Vagrant, apply cookbooks via Chef and ensure compliance by leveraging Inspec. Doing these steps manually would cause an signifanctly higher effort.
Vagrant
Vagrant is a tool for deploying and configuring VMs; in software development, it is used as abstraction layer between Hypervisor (e.g. VMware, VirtualBox, Hyper-V, AWS,...) and Configuration Management (e.g. Chef, Salt, Ansible, Puppet).
After VM deployment, Vagrant can also configure the VM. It is possible to handover and start scripts or stream conent via FTP/SFTP. By integrating Configuration Management systems, it is also possible to assign roles and cookbooks.
On their website, Vagrant also offers a collection of preconfigured VM templates that are also called boxes. After registrierung, it is possible to serve your own boxes. When creating a box, keep the following tasks in mind:
- Installing the guest operating system
- Installing the appropriate Hypervisor tools (e.g. VMware Tools oder VirtualBox Guest Additions)
- Creating a vagrant user for SSH connections
Fort he following sections, it is important to install one of the supported hypervisors (VirtualBox, VMware, Hyper-V).
When using a VMware hypervisor, keep in mind that you will need a dedicated plugin including a license!
The most important commands can be found in the table below:
| Command | Explanation |
|---|---|
vagrant box add (box) |
Adds a box from the catalog |
vagrant box list |
Lists downloaded boxes |
vagrant box remove (box) |
Removes a box |
vagrant box update (box) |
Updates a box |
vagrant init |
Creates a Vagrantfile |
vagrant reload |
Reloads the Vagrantfile after customisation |
vagrant validate |
Validates the Vagrantfile |
vagrant up |
Deploys and starts an instance |
vagrant provision |
Re-deploys an instance |
vagrant destroy |
Removes a provisioned instance |
vagrant port |
Lists defined port forwardings |
vagrant ssh-config |
Lists the SSH configuration |
vagrant ssh |
Creates a SSH connection |
vagrant powershell |
Creates a Powershell remote session |
vagrant rdp |
Creates a RDP connection |
vagrant status |
Lists instance state |
vagrant suspend |
Suspends the VM |
vagrant resume |
Resumes the VM |
vagrant halt |
Halts the VM |
Using the following command a box is important - in this example it will be the CentOS 7 box, that is available for multiple hypervisors:
 1$ vagrant box add centos/7
 2==> box: Loading metadata for box 'centos/7'
 3    box: URL: https://vagrantcloud.com/centos/7
 4This box can work with multiple providers! The providers that it
 5can work with are listed below. Please review the list and choose
 6the provider you will be working with.
 7
 81) hyperv
 92) libvirt
103) virtualbox
114) vmware_desktop
You can also specify the provider during deployment so no manual action is required:
1$ vagrant box add centos/7 --provider virtualbox
Downloaded boxes can be found on unixoid systems below the ~/.vagrant.d/boxes folder. Under Microsoft Windows, check out the folder C:\Users\<user>.vagrant.d\boxes instead.
As a box only represents a kind of template you will not find a VM in VirtualBox yet. For this, Vagrant needs a Vagrantfile that specifies a instance. The file is created like this:
1$ mkdir centos7 ; cd $_
2$ vagrant init centos/7
Afterwards, you will find a file named Vagrantfile in the current directory. This file contains additional settings such as the network configuration or commands executed during deployment.
Deploying and starting the instance is executed with the following command:
1$ vagrant up

Afterwards, a virtual machine is running on your computer.
Leveraging SSH is a very common way to access an instance. Use the ssh-config command in order to show the SSH configuration:
1$ vagrant ssh-config
2Host default
3  HostName 127.0.0.1
4  User vagrant
5  Port 2222
6  PasswordAuthentication no
7  IdentityFile /Users/christian/Documents/Vagrant/centos7/.vagrant/machines/default/virtualbox/private_key
8  IdentitiesOnly yes
9  LogLevel FATAL
You can also directly connect via SSH:
1$ vagrant ssh
2[vagrant@localhost ~]$ cat /etc/redhat-release
3CentOS Linux release 7.5.1804 (Core)
Time for a test, a web server is installed on the system:
1[vagrant@localhost ~]$ sudo yum install -y httpd
2[vagrant@localhost ~]$ sudo systemctl enable httpd ; sudo systemctl start httpd
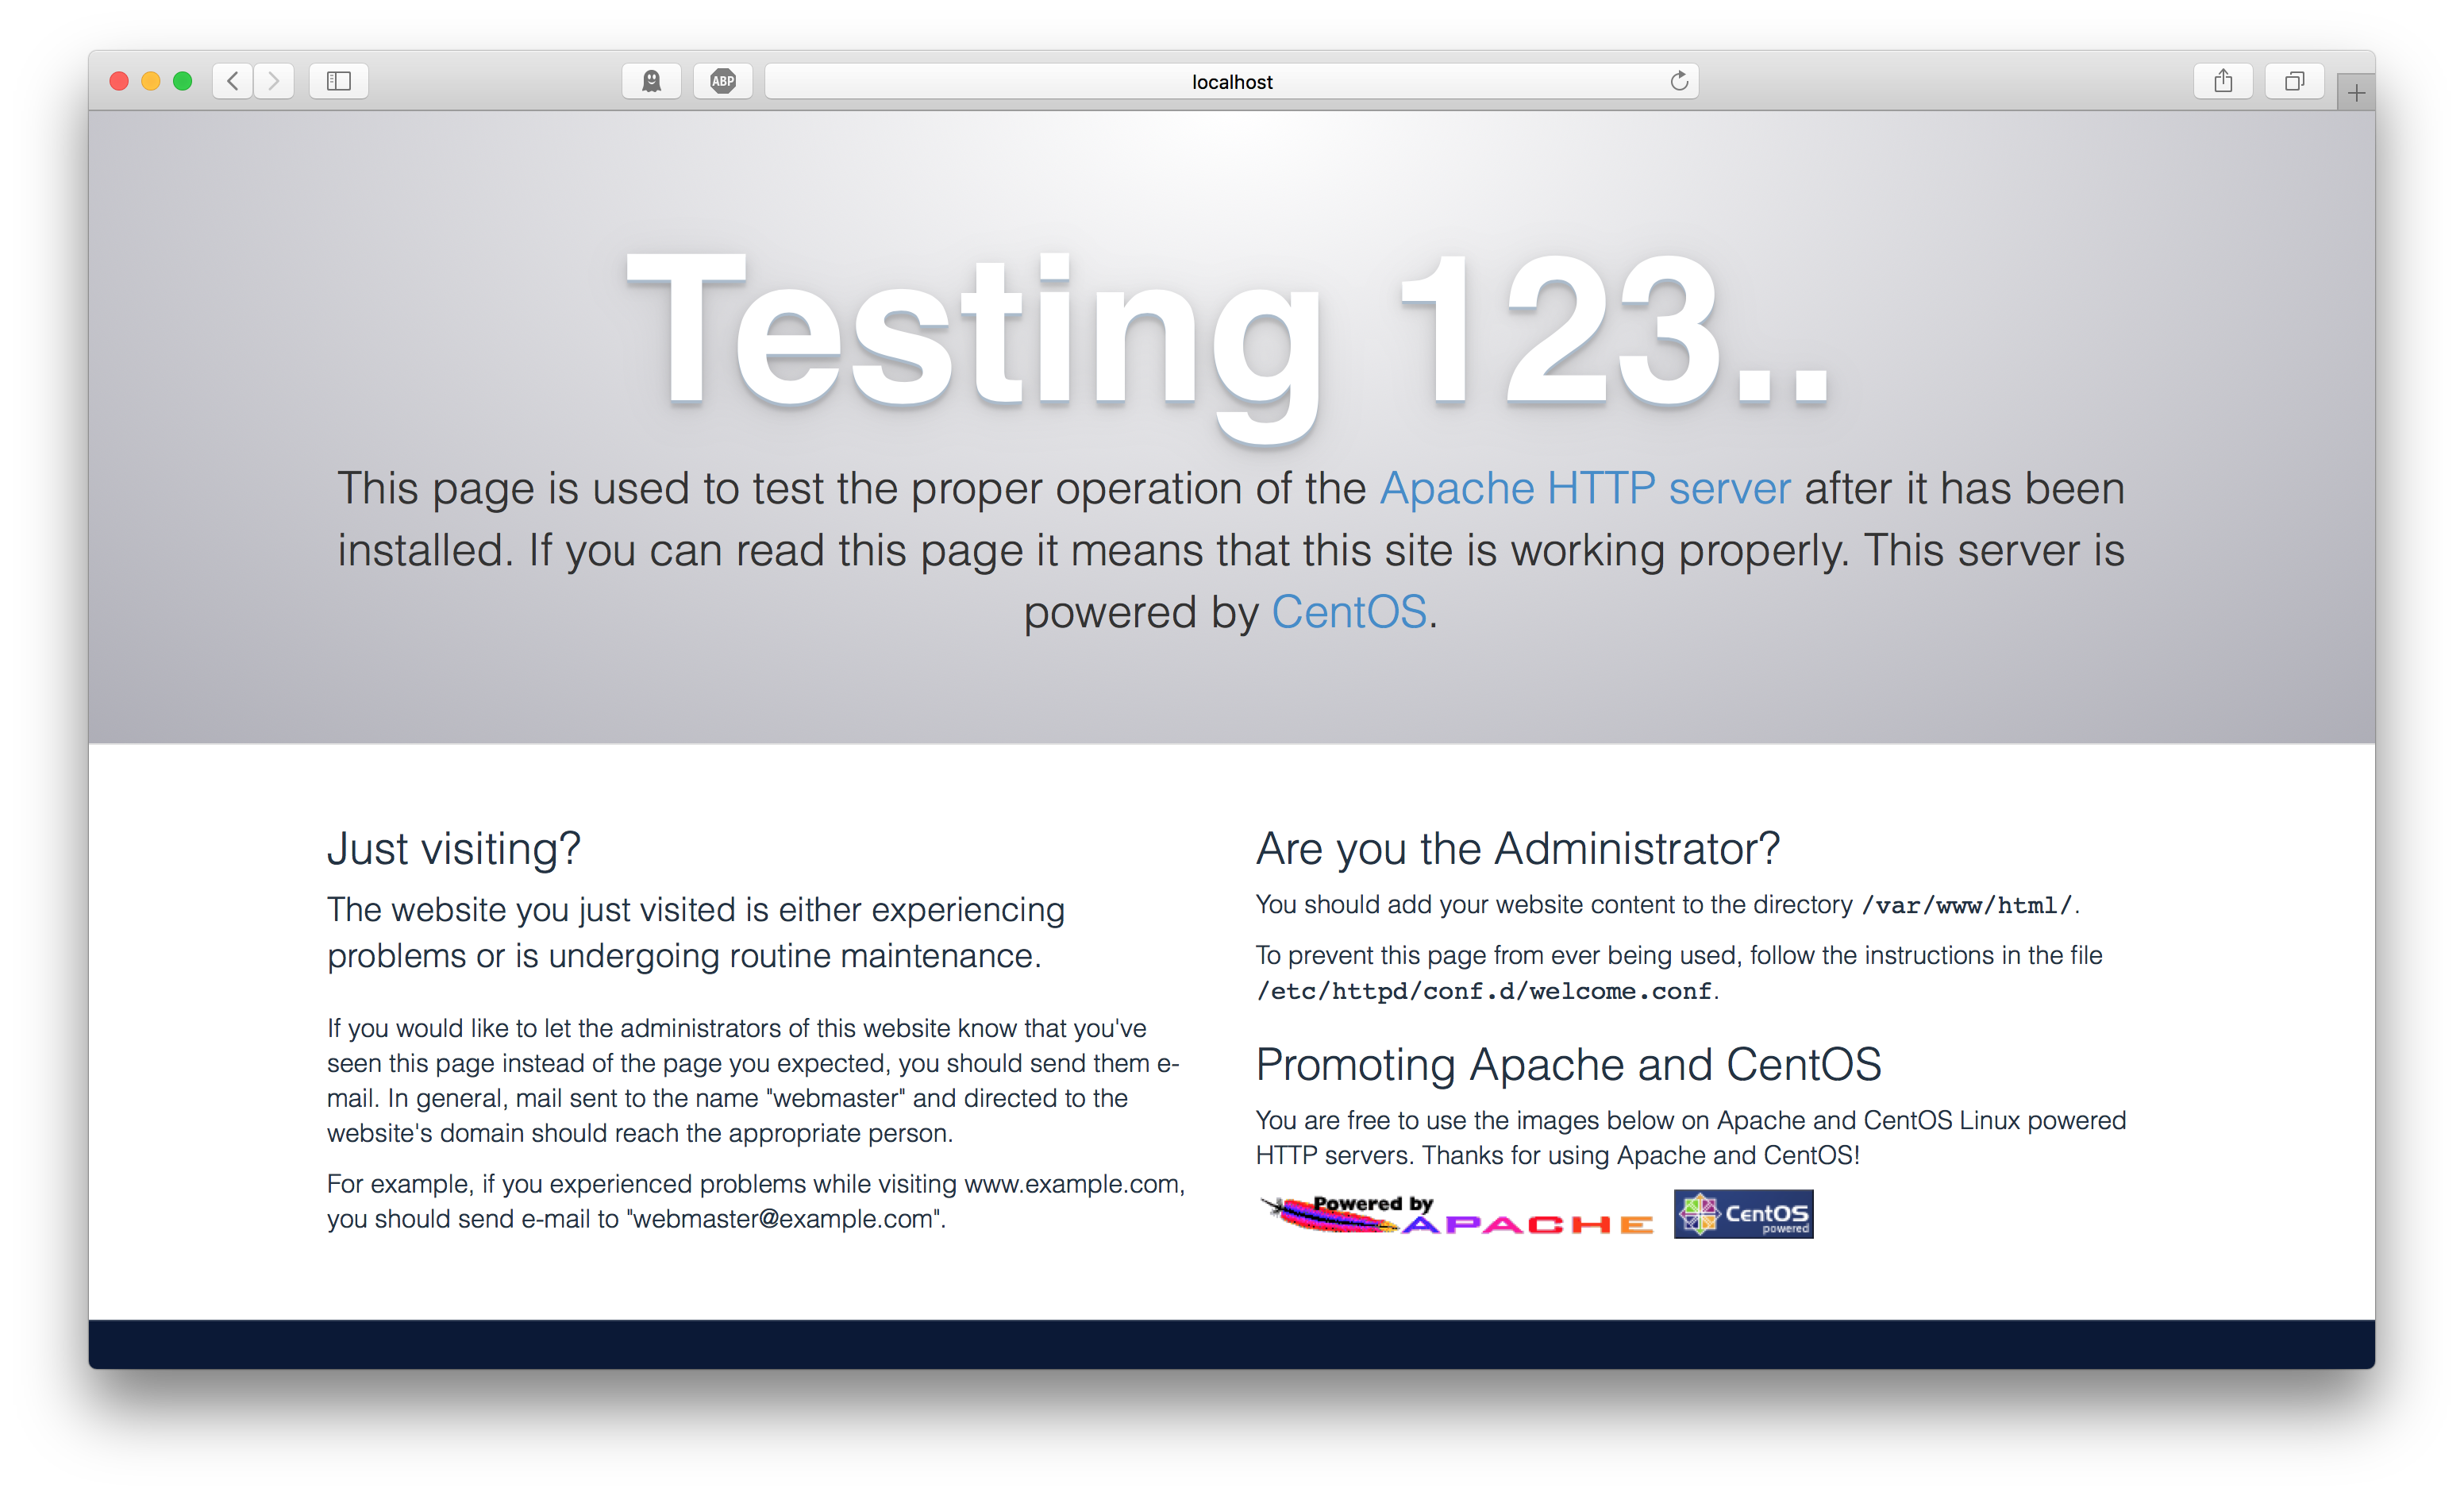
While the access is possible locally, access outside the VM is not possible. The reason ist hat no port forwarding is defined; for this, the Vagrantfile needs to be altered:
1config.vm.network "forwarded_port", guest: 80, host: 8080, host_ip: "127.0.0.1"
Hints about additional settings can be found in the official documentation
In order to apply changes, the reload command needs to be entered. Using this command, the new configuration is inherited and the VM is rebooted:
1$ vagrant reload
Afterwards, access via the address http://localhost:8080 is possible:
The cookbook

The cookbook is this logic’s most crucial part we need to create now. As mentioned, a cookbook consists of one or multiple recipes and test definitions. The first step is to install Chef Workstation. Afterwards Chef files can be created from templates using the chef generate command. Of course, you can also create these files on your own - but I do not recommend you to do so. If you’re using the command mentioned above, Chef will create all required folders and additional files. As an example, when creating a recipe, the required unit and integration tests are created as well. So you will save a lot of time and effort.
1$ mkdir cookbooks ; cd $_
2$ chef generate cookbook basic-webserver
3$ cd basic-webserver
Afterwards you will find the following sub folders in the current directory:
recipesspec- unit teststest- integration tests
For documenation purposes, the files CHANGELOG.md and README.md are created - they are used to track changes and the purpose (in Markdown). The file metadata.rb is also important as it contains metadata such as the cookbook version as well as information about usage and author.
Integration tests with Inspec
Inspec is our tool for auditing recipes, it was created by the members of the DevSec Hardening Framework team. It is required to define the desired state that should be covered by code. When running chef generate, both recipes and Inspec templates below test/integration/default will be created. The example (default_test.rb) looks like this:
 1# # encoding: utf-8
 2...
 3unless os.windows?
 4  # This is an example test, replace with your own test.
 5  describe user('root'), :skip do
 6    it { should exist }
 7  end
 8end
 9
10# This is an example test, replace it with your own test.
11describe port(80), :skip do
12  it { should_not be_listening }
13end
In this example, two tests are defined; because of the :skip directive, they are skipped and not checked. The first test checks the root user existence if no Windows operating system is given. The second test requires a particular TCP port not to listen to requests.
Inspec defines entities (e.g. service, file, web application,...) as resources, that also have an expected state which is defined via matchers. Beside generic matchers (should/should + comparable to, contain, bigger/smaller) there are also specific matchers per resource (e.g. http request should return code xyz). These tests are simple and because of their language self-explanatory.
Time to define the following tests:
- The package httpd should be installed
- The TCP port 80 should be openend
- Accessing the URL http://localhost should return a valid result
For this, the Inspec resources package, port and http are needed:
 1# # encoding: utf-8
 2
 3# Inspec test for recipe basic-webserver::default
 4
 5# Make sure that the httpd package is installed
 6describe package('httpd') do
 7  it { should be_installed }
 8end
 9
10# Make sure that the web server port is listening
11describe port(80) do
12  it { should be_listening }
13end
14
15# Make sure that the homepage is accessible
16describe http('http://localhost') do
17  its('status') { should cmp 200 }
18end
The most important specifics are assigned to resources as parameter: so package will contain the particular package, port will be assigned to a network port and http consists of the URL that needs to be checked. By leveraging it/its filter and should matchers the expected state is concretized.
Information about additional resources and matchers can be found in the official documentation
When these tests are executed now, they will fail:
 1$ inspec exec default_test.rb
 2
 3Profile: tests from default_test.rb (tests from default_test.rb)
 4Version: (not specified)
 5Target:  local://
 6
 7  System Package httpd
 8 ×  should be installed
 9     expected that `System Package httpd` is installed
10  Port 80
11 ×  should be listening
12     expected `Port 80.listening?` to return true, got false
13  http GET on http://localhost
14 ×  status
15     Failed to open TCP connection to localhost:80 (Connection refused - connect(2) for "localhost" port 80)
16
17Test Summary: 0 successful, 3 failures, 0 skipped
No test was successful. The reason for this is that we executed the tests on the host running Inspec and not the VM. To fix this, we will audit a VM via Test Kitchen.
Test Kitchen
Test Kitchen is able to deploy VMs for environments to be checked using Vagrant. Afterwards, Chef Cookbooks are applied and integration tests are executed using Inspec. For this, the configuration file .kitchen.yml in the cookbooks folder needs to be altered:
 1---
 2driver:
 3  name: vagrant
 4
 5provisioner:
 6  name: chef_solo
 7
 8verifier:
 9  name: inspec
10
11platforms:
12  - name: centos/7
13
14suites:
15  - name: default
16    run_list:
17      - recipe[basic-webserver::default]
18    verifier:
19      inspec_tests:
20        - test/integration/default
21    attributes:
Make sure to choose the vagrant driver. The provisioner directive controls the software stack used for configuration. Beside classical shell scripts, also Configuration Management products such as Ansible or Chef are supported. Below platforms, you will need to specify the environments that need to be configured and checked - in this example this would be the name of our Vagrant box. Inspec is used as verifier in this context, below suites cookbooks and integration tests are specified. In this example, the main recipe and all tests below test/integration/default are used.
The following command lists all defined test scenarios:
1$ kitchen list
2Instance          Driver   Provisioner  Verifier  Transport  Last Action    Last Error
3default-centos-7  Vagrant  ChefSolo     Busser    Ssh        <Not Created>  <None>
In this case, only one environment needs to be checked - the CentOS 7 we still need to create. The following command creates the appropriate VM and runs the test afterwards:
 1$ kitchen verify
 2...
 3  System Package httpd
 4 ×  should be installed
 5     expected that `System Package httpd` is installed
 6  Port 80
 7 ×  should be listening
 8     expected `Port 80.listening?` to return true, got false
 9  http GET on http://localhost
10 ×  status should cmp == 200
11
12     expected: 200
13          got:
14
15     (compared using `cmp` matcher)
16
17Test Summary: 0 successful, 3 failures, 0 skipped
18>>>>>> ------Exception-------
19>>>>>> Class: Kitchen::ActionFailed
20>>>>>> Message: 1 actions failed.
21>>>>>>     Verify failed on instance .  Please see .kitchen/logs/default-centos-7.log for more details
22>>>>>> ----------------------
23>>>>>> Please see .kitchen/logs/kitchen.log for more details
24>>>>>> Also try running `kitchen diagnose --all` for configuration
Kitchen lists three failed tests - and that is correct as we did not cover the desired state in a recipe by now.
An option would be to implement this logic in the main recipe recipes/default.rb. Bigger cookbooks normally consist of multiple recipes that are executed in an ordered manner using the main recipe. As this use case is small, we can simply implement the logic in the main recipe:
 1#
 2# Cookbook:: basic-webserver
 3# Recipe:: default
 4#
 5# Copyright:: 2018, The Authors, All Rights Reserved.
 6
 7# Install httpd package
 8yum_package 'httpd' do
 9  action :install
10end
11
12# Stage content
13template '/var/www/html/index.html' do
14  source 'index.html.erb'
15  owner  'root'
16  group  'root'
17  mode   '0755'
18end
19
20# Start and enable service
21service 'httpd' do
22  action [:enable, :start]
23end
Like for Inspec definitions, resources are referenced: yum_package, template and service. While Inspec detects the package architecture on its own, it is required to specify the package architecture for recipes. As CentOS utilizes the YUM package manager, yum_package is used.
The template resource places a file template in a location while respecting file permissions and macros that are replaced with variables or Ruby code. That can be very useful for more complex configuraion files. As an example, you can set IP addresses and other host-specific information dynamically rather than entering them manually.
Afterwards, the service ressource is used to start the web server and enable it for auto-start during the boot process.
Informaiton about additional resources can be found in the official documentation
The template for the web server’s default site needs to created - for this, an appropriate folder and file are created:
1mkdir templates ; echo 'Hello World' > templates/index.html.erb
Finally, the following command is used in order to force applying the cookbook:
 1$ kitchen converge
 2...
 3       Converging 3 resources
 4       Recipe: basic-webserver::default
 5         * yum_package[httpd] action install
 6           - install version 0:2.4.6-80.el7.centos.1.x86_64 of package httpd
 7         * template[/var/www/html/index.html] action create
 8           - create new file /var/www/html/index.html
 9           - update content in file /var/www/html/index.html from none to d2a84f
10           --- /var/www/html/index.html	2018-09-13 17:58:15.092708946 +0000
11           +++ /var/www/html/.chef-index20180913-3554-be1pv.html	2018-09-13 17:58:15.091708900 +0000
12           @@ -1 +1,2 @@
13           +Hello World
14           - change mode from '' to '0755'
15           - change owner from '' to 'root'
16           - change group from '' to 'root'
17           - restore selinux security context
18           service[httpd] action enable
19           - enable service service[httpd]
20           service[httpd] action start
21           - start service service[httpd]
Here you can see that Chef configured the defined resources.
Afterwards, auditing the tests should deliver different results:
 1$ kitchen verify
 2...
 3  System Package httpd
 4 ✔  should be installed
 5  Port 80
 6 ✔  should be listening
 7  http GET on http://localhost
 8 ✔  status should cmp == 200
 9
10Test Summary: 3 successful, 0 failures, 0 skipped
Three tests were executed successfully, hooray! Our recipe code now covers the pre-defined desired state. In a next iteration, additional criterias and code could be implemented.
Our test scenarios now should list a valid state:
1$ kitchen list
2Instance          Driver   Provisioner  Verifier  Transport  Last Action    Last Error
3default-centos-7  Vagrant  ChefSolo     Busser    Ssh        Verified       <None>
In an agile environment this would be the time to commit changed cookbook code in the version control system and update managed infrastructure. When generating cookbooks, Chef also created a Git repository to enable leveraging version control:
1$ git add *
2$ git commit -m "Initial commit"
After executing tests, the temporarily created resources - the CentOS VM in this case - can be deleted like this:
1$ kitchen destroy
Conclusion
We created our first Chef cookbook, defined desired states and covered them in a recipe - great! With the tools we focussed on in this post even more complex configuration can be tested in a parallel and timesaving manner on multiple platforms - which is mandatory for agile, DevOps-oriented environments. In the end, we need to keep in mind that there are some things in this scenario, that could be optimized:
- Recipes could be distribution-independent in order to set-up a comparable webserver also on openSUSE
- Instances that need to be checked could also be deployed on cloud resources rather than using Vagrant
- Security checks to avoid insecure default settings could be included (DevSec offers great profiles and auto remediation cookbooks for this)
- Additional content could be deployed, e.g. a complete database including PHP module
- The whole process could be implemented in a CI/CD pipeline in order to publish cookbooks after code analysis on a Chef server
As you can see, there are plenty of possibilities - this post should only be an intro and little teaser. Happy converging! 🙂