DIY voice assistant part 2: Linked components and first function
In the last part of this series we checked-out and installed software for building our own voice assistant without leverage cloud resources. In this article we will focus on linking both Rhasspy and Node-RED. At the end, the assistant will learn it's first function.
Desired state
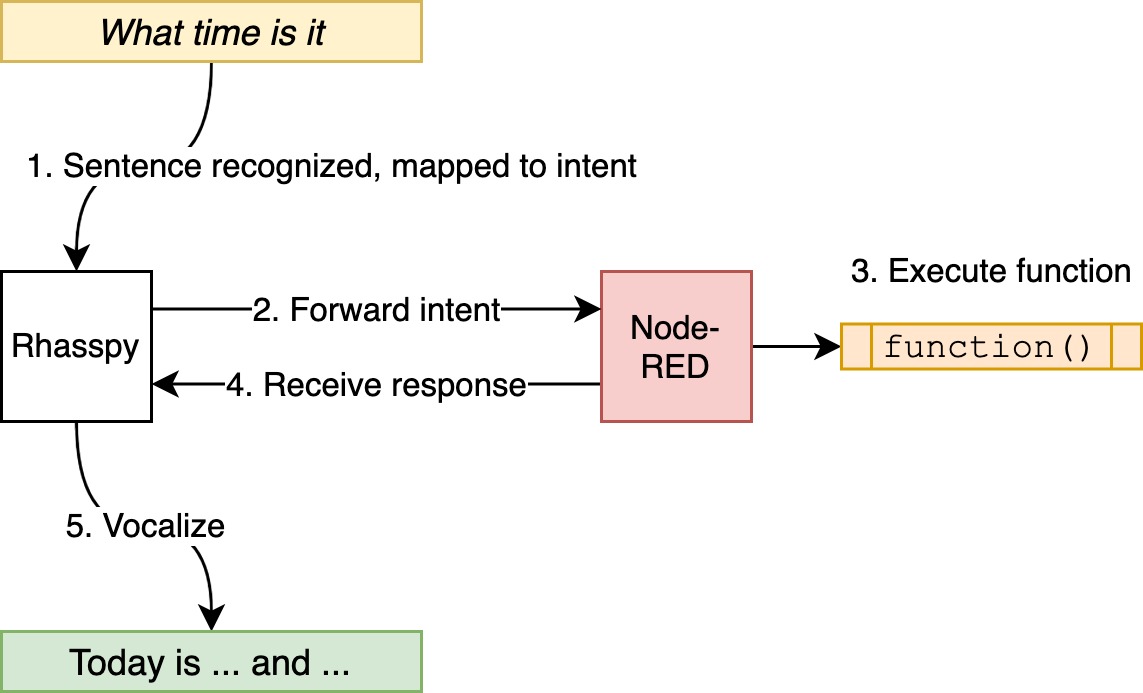
As we already know from the last article, Rhasspy is not able to execute intents on it's own - for this it needs an external tool such as Node-RED.
Rhasspy should be able to map recognized sentence fragments (Sentences) to the appropriate commands (Intents) and forward these requests to Node-RED. Node-RED on the other hand executes - depending on the context - a function and returns the answer back to Rhasspy. Finally, the answer is read read using the speakers.
Reading the current time and date will be used as example.
The whole code of this and following articles can be found on GitHub
Preparation
Before the voice assistant is used, it is highly recommended to configure both the wake word and Text2Speech.

Regarding the wake word, I've decided to go for Porcupine as it is more reliable as Pocketsphinx which is used by default. The default wake word equals to the projekt name - anyhow, on GitHub there are several pre-compiled pattern for the Raspberry Pi available to download (my personal favorite is "Terminator"). Currently, customized wake words require a commercial license.
To enable Porcupine, simply click Settings > Wake Word > Use Porcupine on this device in the Rhasspy interface. After saving settings, a library and word patterns need to be downloaded:
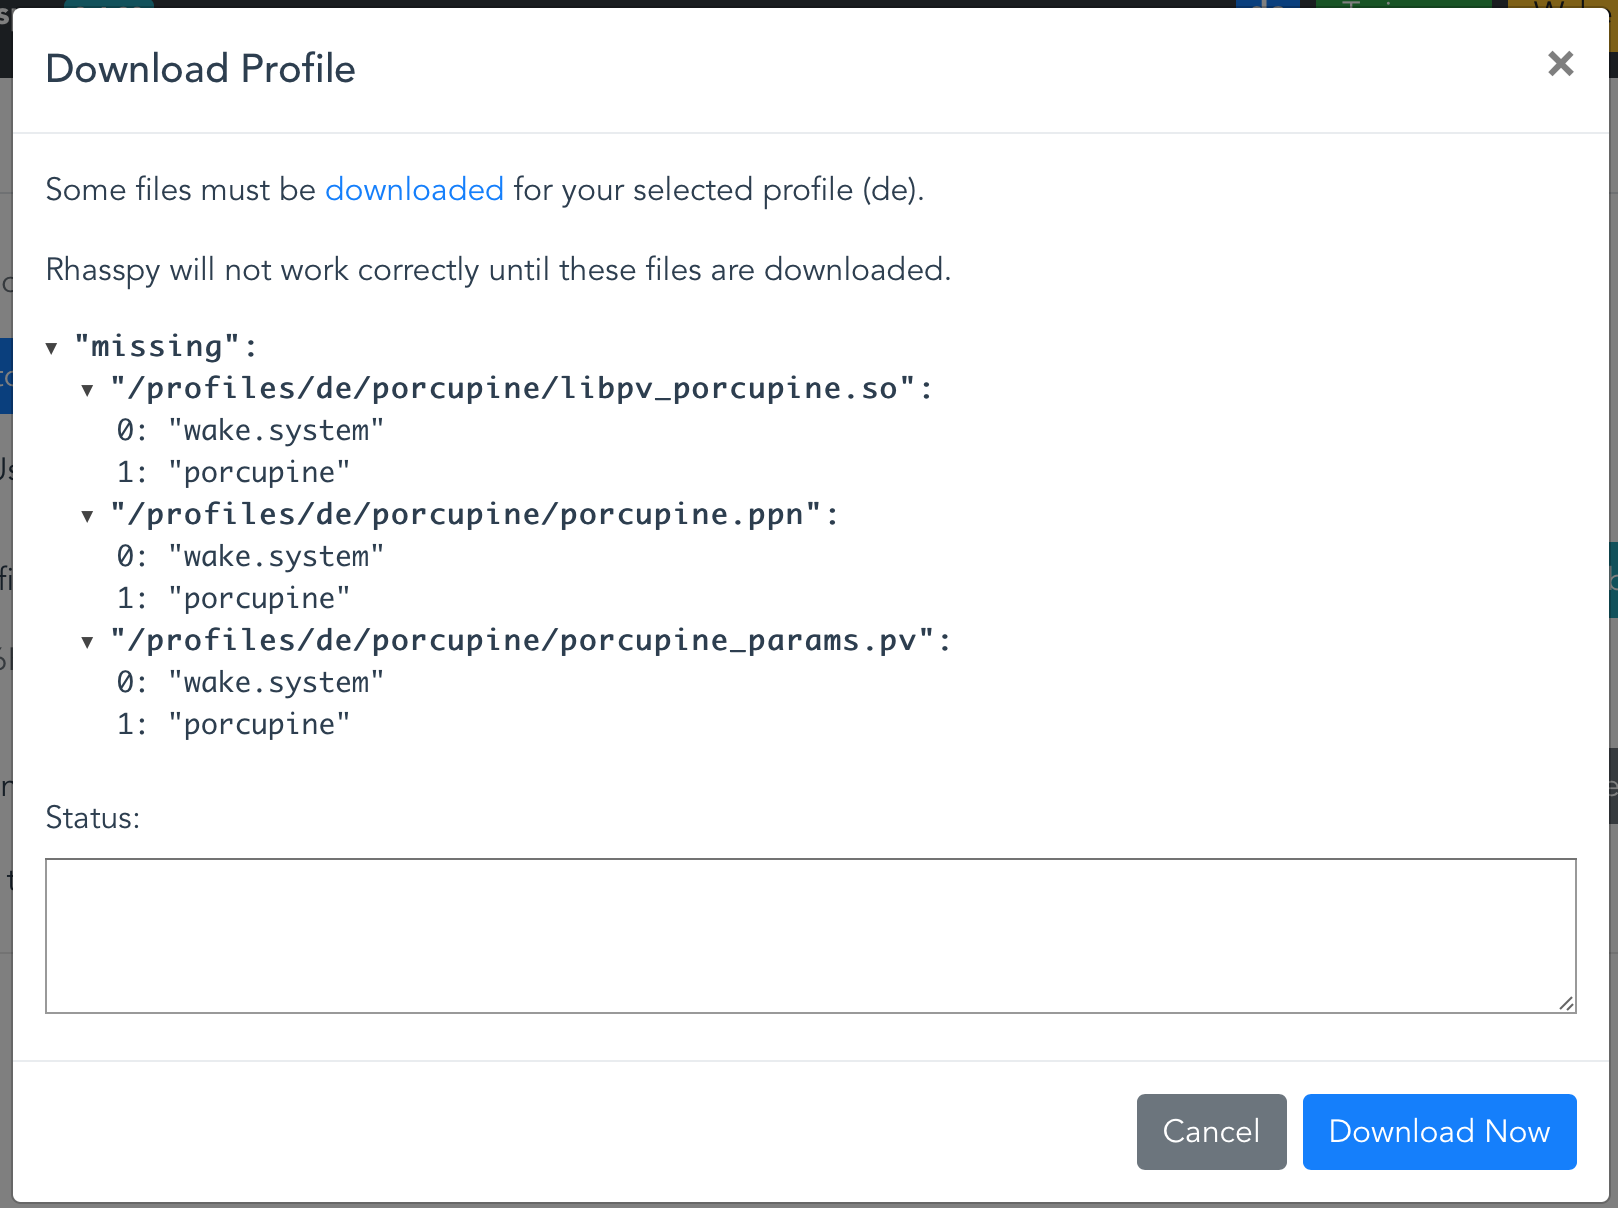
After completing the download, the word pattern reside in the Rhasspy profile folder under rhasspy/profiles/de/porcupine. You can copy the previously mentioned alternative pattern into this folder - ensure to change the configuration afterwards, e.g.:
Keyword Files: porcupine/terminator_porcupine.ppn
By default, Rhasspy uses eSpeak for text2speech - which sounds very unnatural and tinny. In another blog post I described how to compile and install the pleasing alternative Pico TTS on Raspbian.
Personally, I don't like the flute-like sounds that are played during speech recognition. Luckily there are some alternative sounds in the pre-built Docker containers. The sounds can be changed by clicking Settings > Sounds:

Here's the path for copy & paste: /usr/share/rhasspy/.venv/lib/python3.7/site-packages/snowboy/resources
Finally clicking Train ensures that the changes are applied to the assistant's logic
Linking Rhasspy and Node-RED
Linking both systems is actually trivial. Move to the Rhasspy interface and click Settings and Intent Handling and enter the handler URL. We still need to create the handler in Node-RED, but we can already enter the URL:
http://

Intent structure and handler
Now it's time to have a look at the Intent structure - the first step is to create a Node-RED flow that listens to HTTP requests. Intents are forwarded by Rhasspy using POST.
Start by dragging a http in node from the left panel into the work area and configure it like this:
| Method | POST |
|---|---|
| Accept file uploads? | No |
| URL | /intent |
| Name | Detect intent |
Afterwards drag a debug node next to the http in node and link both nodes with a connection. This will result in immediately printing a HTTP request's data once it was received - so that we can have a deeper look at it.
The flow now looks like this:
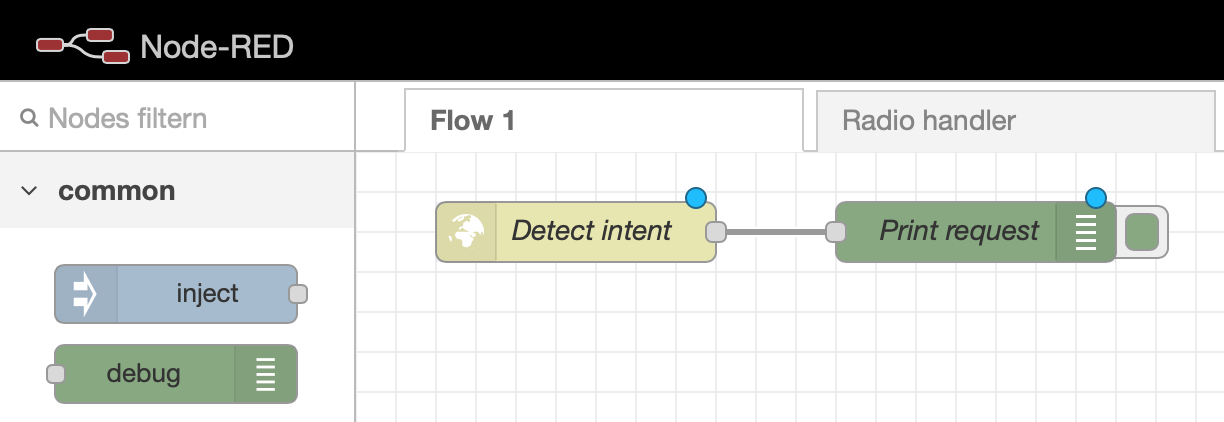
After clicking Deploy in the upper-right corner changes are saved and applied. Now, the web server is enabled and listens for requests - test it with curl:
1$ curl -X POST http://<node-red-ip-adresse>:1880/intent
Currently the server will not reply to the request - a timeout will be the result
On the right you will find a bug icon in the Node-RED interface. After clicking it debug messages are printed - selectively for the current or all flows. You will find the request here:
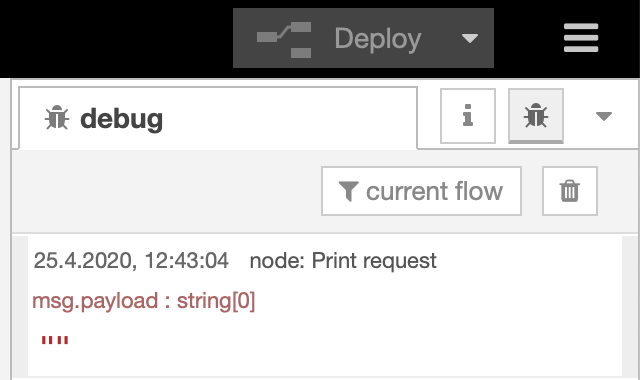
Our message's payload (content) is empty - but what will it look like when Rhasspy forwards an intent?
Sentences
For this, we will need to go one step back. At this article's beginning we learned that Rhasspy tries to map recognized words and sentence fragments to particular commands. This means that such a command with possible phrasings needs to be created first. Clicking Sentences in the Rhasspy interface opens a dialog with simple and advanced examples. Expand it with the following lines:
1[GetTime]
2what time is it
3what date is it
4which day is today
5tell the time
This will define a command GetTime with various phrases - without punctation marks and in lower-case. After clicking Save Sentences and Train the new functionality is available.
After moving to the Speech pane, the command can be executed in three ways. Of course, one possibility is to simply talk to the assistant by using the wake word. Another way it to record the command using the browser by clicking Hold to Record or Tap to Record. The third option is to simply enter a valid phrase next to Sentence and click Get Intent.

In every case, the debug output in Node-RED should contain a much longer message payload. The payload is encapsulated in JSON and Node-RED will convert it into native objects and key/value pairs.
By hovering over particular message elements data paths or content can be copied - e.g. to manipulate them in other tools.
The follwoing payload elements are important:
intent.name- recognized commandtext/raw_text- recognized phrasetokens- array with phrase words (useful for more complex commands)
The first function
Depending on recognized commands, it is possible to create branches in Node-RED. For this, drag a switch node from the tool in the flow - connect the left input with http in node output on the right. After double-clicking the new element, apply the following configuration:

The recognized command name is used as input property - it can be accessed via the path msg.payload.intent.name. Using the dialog you can define multiple conditions - in this case:
- If the value is "GetTime" execute 1
- Otherwise execute 2
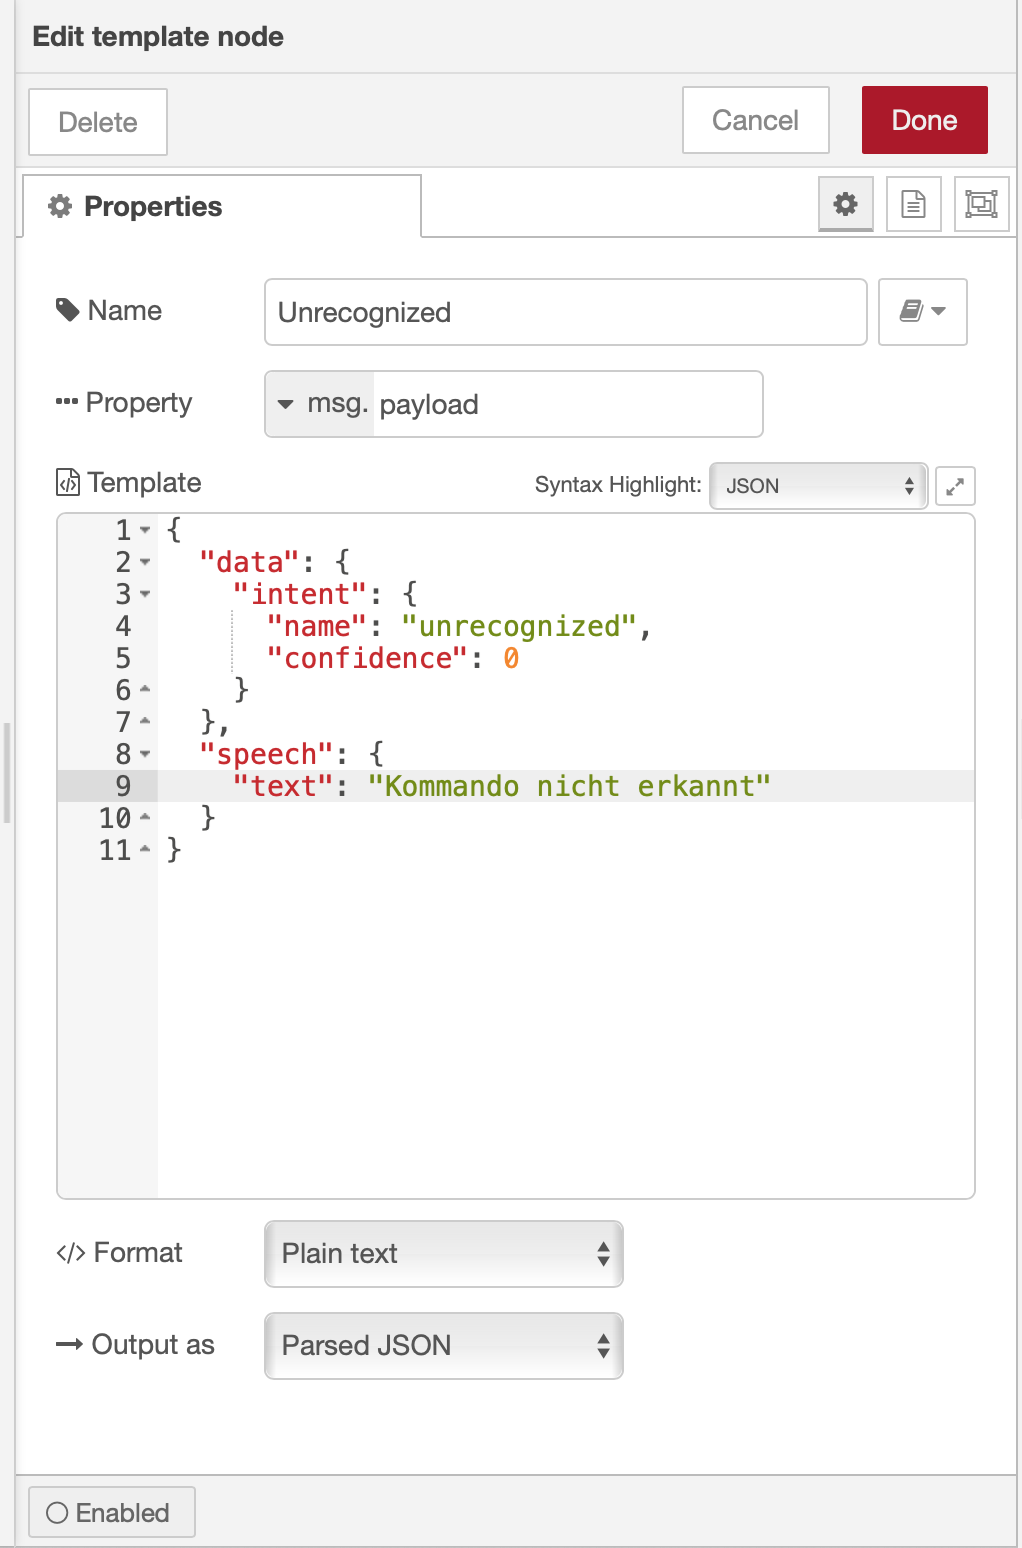
The second condition will notify the user that the command cannot be recognized. It should be a simple error message so that the user knows that he mumbled way too much. This message will be vocalized by Rhasspy. To implement this function, we will drag a function node next to the switch node und and connect the new node's input it with the second output (name will be printed by hovering). Double-click again and apply the following configuration:
- Name: Unrecognized
- Property:
msg.payload - Format: Plain text
- Output as: Parsed JSON
The JSON template looks like this:
 1{
 2  "data": {
 3    "intent": {
 4      "name": "unrecognized",
 5      "confidence": 0
 6    }
 7  },
 8  "speech": {
 9    "text": "Unknown command."
10  }
11}
Rhasspy expects the answer to contain a data dictionary with the appropriate executed intent. The speech dictionary is optional, it defines text that will be vocalized with the text value. In this case, it contains a simple error message.
After the answer was defined, it needs to be sent back to the requesting client - for this we will drag a http response node to the flow. This node type is only valid with an existing http in node as it retrieves the client's IP address and other information from this node. The function node's output is connected to the response node's input. After double-clicking, apply the following settings:
- Name: Send answer
- Headers:
- Content-Type: a
pplication/json
- Content-Type: a
Especially, the content-type is important as otherwise the communication between Rhasspy and Node-RED might not work properly. Rhasspy sends a JSON-encoded request and therefore also expects an answer in the same format.
Currently, the flow looks like this:

A function for retrieving the current time and date is still missing. To implement it, another function node is dragged onto the flow - connect it with the other switch node output. Double-click the item to enter the following values:
- Name: Tell date/time
- Outputs:
1
The output needs to be set to 1 as the function uses JavaScript to create a sentence that needs to be placed in a JSON template before sending the response back to the client.
The code looks like this:
 1// get current time and date
 2now = new Date();
 3
 4// get day, month, year
 5day = now.getDate();
 6month = now.toLocaleString('default', { month: 'long' });
 7year = now.getFullYear();
 8hours = now.getHours();
 9minutes = now.getMinutes();
10
11// set-up and return string
12msg.payload = "Today is " + day + ". " + month + " " + year + " and the time is " + hours + " " + minutes + ".";
13return msg;
Next to the function node, place another template node and link output and input accordingly. The settings for the template differ this time:
- Name: Intent response
- Property:
msg.payload - Format: Mustache template
- Output as: Parsed JSON
The template content is more bulky this time:
 1{
 2  "intent": {
 3    "name": "GetTime",
 4    "confidence": 0
 5  },
 6  "speech": {
 7    "text": "{{ payload }}"
 8  },
 9  "wakeId": "",
10  "siteId": "default",
11  "time_sec": 0.010800838470458984
12}
Notice that speech.text is not hard-coded this time - it get's defined using a variable. Because of this, it is mandatory that the format was set to Mustache template. There are also some new parameters wakeID, siteID and time_sec. The last parameter defines how long it took the function to execute the request. I did not see any additional value in this information so I simply set a random value. I'm also quite unsure about the meaning of wakeId and siteID - they are part of the original Rhasspy request. If those values are omitted, Rhasspy prevents the intent from execution.
Finally, link the template output with the response input. The flow now looks like this:

After clicking Deploy the handler is available - test it with curl again:
1$ curl -H "Content-Type: application/json" -X POST -d '{"intent": {"name": "GetTime"}}' http://<node-red-ip-adresse>:1880/intent
2{"intent":{"name":"GetTime","confidence":0},"speech":{"text":"Heute ist der 26. April 2020 und es ist 9 Uhr 51."},"wakeId":"","siteId":"default","time_sec":0.010800838470458984}
The curl parameters -H and -d are needed for setting the JSON header and payload as the handler now expects the Rhasspy-typical request structure.
Time for a test! Using one of the three possibilities the Intent is triggered - and after some seconds an answer should be vocalized:

Congratulation - the assistant just learned it's first function! 🙂
Conclusion
In this article we linked two essentials components of your voice assistant - also, the assistant learned its first function. In the next part we will focus on reading temperature sensors and weather information from the internet.