DIY voice assistant part 3: Temperature sensors and weather information
In the last part of this series we linked Rhasspy and Node-RED to teach the assistant its first function: reading the current date and time. In this part we will focus on measuring temperature via the internet and DIY temperature guards based on ESP32 and MQTT.
DIY temperature guard
Temperature sensors are cheap and even microcontrollers (e.g. Arduino or ESP32) can often be bought for under 10 Euro. Using the Arduino IDE those components can easily be programmed - for example to read the room temperature and share values using WLAN. There are plenty of sensors available online making it hard to keep track - here's a listing of some common sensors and their prices:
| Sensor | Connection | Volt | Ampere | Temperature | Accuracy | Price |
|---|---|---|---|---|---|---|
| DHT11 | GPIO | 3 - 5,5 | 0,5 - 2,5 mA | 0 - 50 C° | + / - 5% | ~2 EUR |
| Aosong AM2302 / DHT22 | 3,3 - 6 | 1 - 1,5 mA | -40 - +80 C° | + / - 2% | ~4 EUR | |
| Bosch Sensortec BME280 | I²C, SPI | 1,7 - 3,6 | 340 μA | -40 - +85 C° | + / - 3% | ~5 EUR |
There is a very detailed comparison on this website.
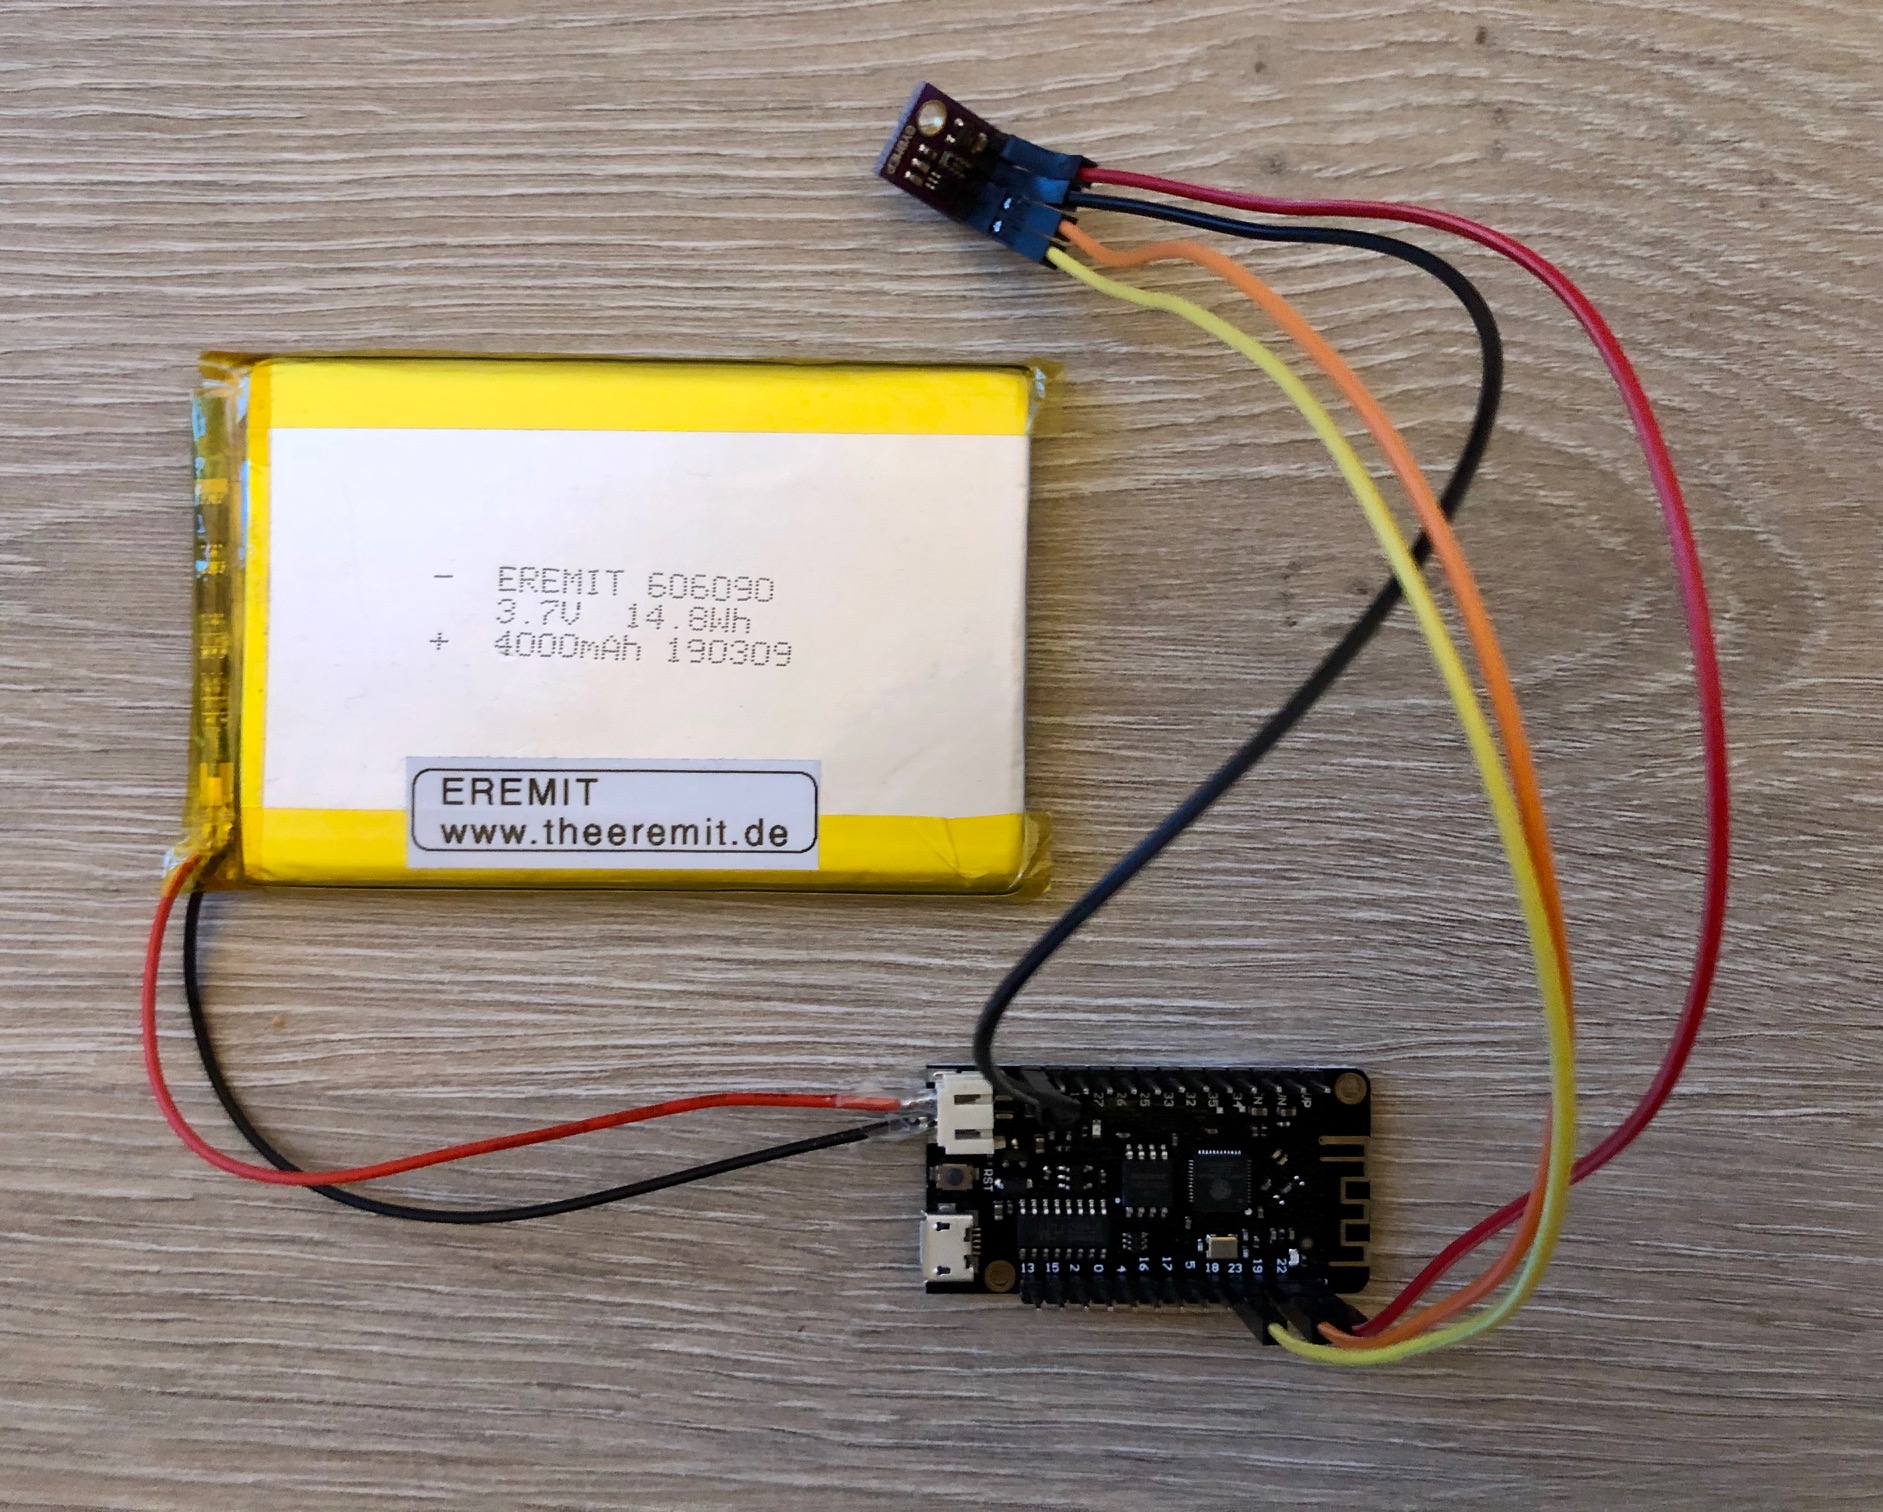
After some tests with the DHT-11/22 I decided to go for the Bosch BME280 sensor. Beside temperature and humidity this sensor also measures air pressure and - which is very important - is way more accurate than the DHT sensors. During testing, there were sometimes multiple degrees difference between the DHT-22 and the BME280. The price is comparable, the power consumption during measurement is lower.
As microcontroller I'm using a ESP32 - the exact derivate is kinda irrelevant as all ESP32 support both WLAN and I²C (Inter-Integrated-Circuit). As I planned using the microcontrollers without a power supply, I decided to go for the WEMOS LOLIN32 Lite as it offers an LiPo interface (Lithium-Polimer) for batteries. On of the advantages of using an ESP32 is that it can be put in a deep sleep mode. In this mode, it will consume very less energy: ca. 10 to 20μA in comparison with 150 to 300mA (=150000 bis 300000μA) in normal mode. The low power consumption is the result of turning-off additional components such as WLAN, bluetooth and the main processor. In combination with a 3.7 volt 4000 mAh battery the microcontroller should do it's job in the best case for multiple months.
This website offers additional detailed explanations.
I could create multiple following-up posts about the ESP32 and programming the logic - but this is not focus of this series and not everybody might be interested in all the details. Therefore, I uploaded a pre-built program to GitHub doing the following things:
- Reading temperature and humidity via I²C bus
- Establishing a connection to WLAN and a MQTT broker
- Publishing measured values
- Set to deep sleep for 15 minutes
Beside the code, you will also find a layout in the repository. Using the Arduino IDE, you can transfer the code to a compatible board.
MQTT in a nutshell
Message Queuing Telemetry Transport (MQTT) is an open protocol for machine to machine communication. It is lightweight and therefore also suitable for microcontrollers and embedded systems with low ressources. The protocol also tolerates high latencies and very low transmit speed. Usually, MQTT uses the TCP/IP stack but it can also use alternate stacks such as UDP and bluetooth. MQTT is often used in IoT projects but also complex facilities use it (sensor communication, machine controls).
The most crucial part of a MQTT scenario is called broker. This component converges the communication as it sends/receives messages of connected clients. Clients are unable to communicate without a broker. By default, messages are unencrypted, but TLS communication is also possible. In additional, brokers such as Eclipse Mosquitto offer username and password authentication.
MQTT structures and exchanges content in topics. Those topics can have a hierarchical structure and limitations - e.g. to only let some users read and write. An example:
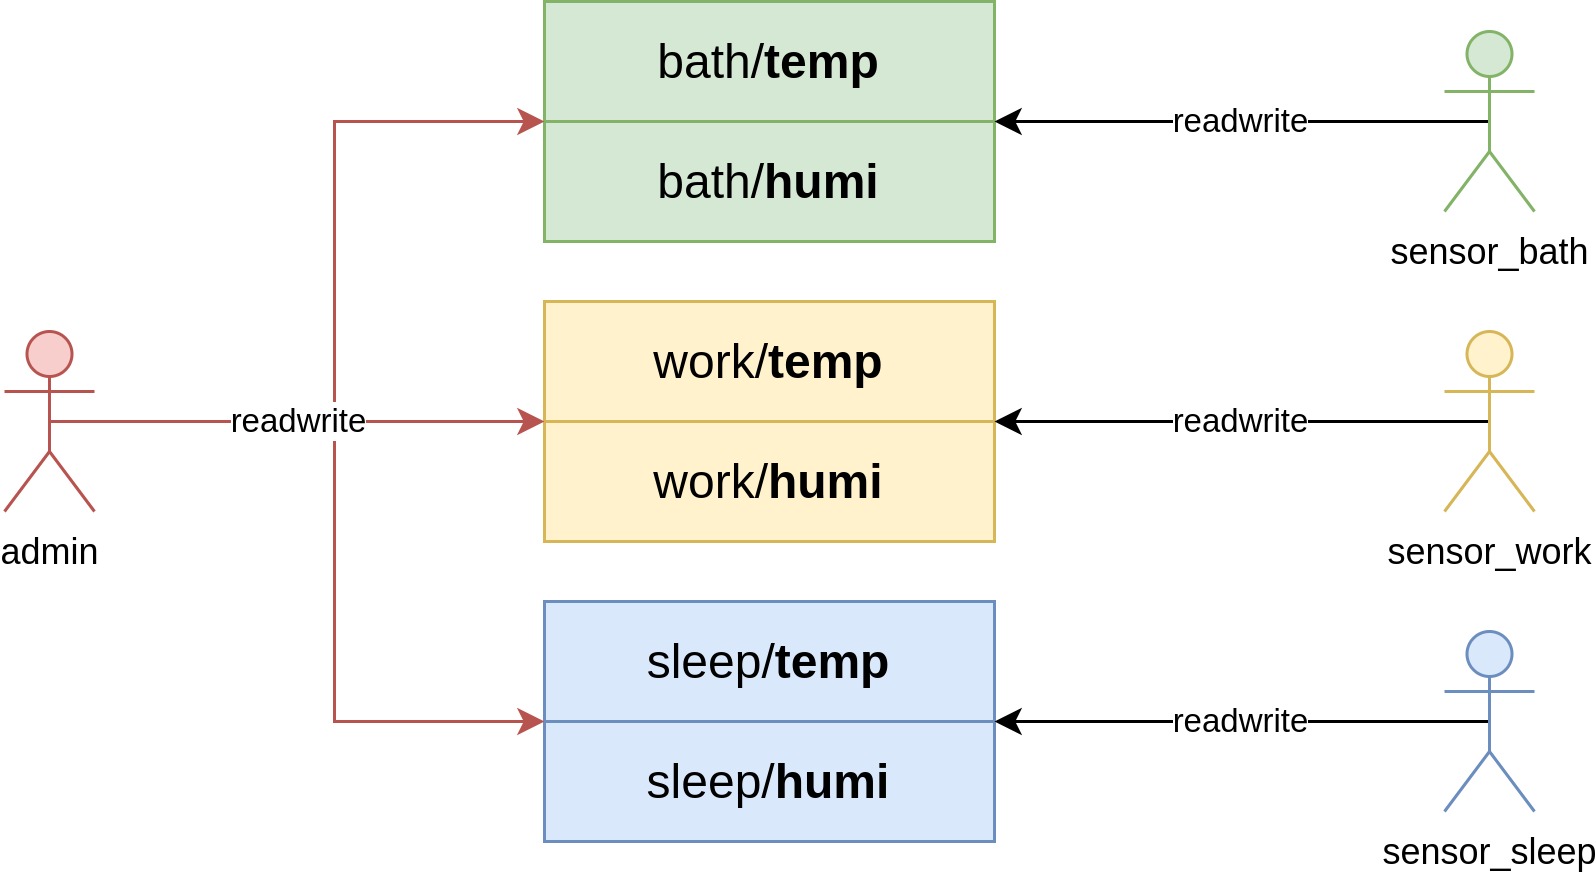
In this example you will find 6 topics: temp (temperature) und humi (humidity) per room (bath, work, sleep). Every room sensor has it's own user (sensor_bath, sensor_work, sensor_sleep) that has read/write access only to it's own topic. The administrator (admin) has read/write access to all topics.
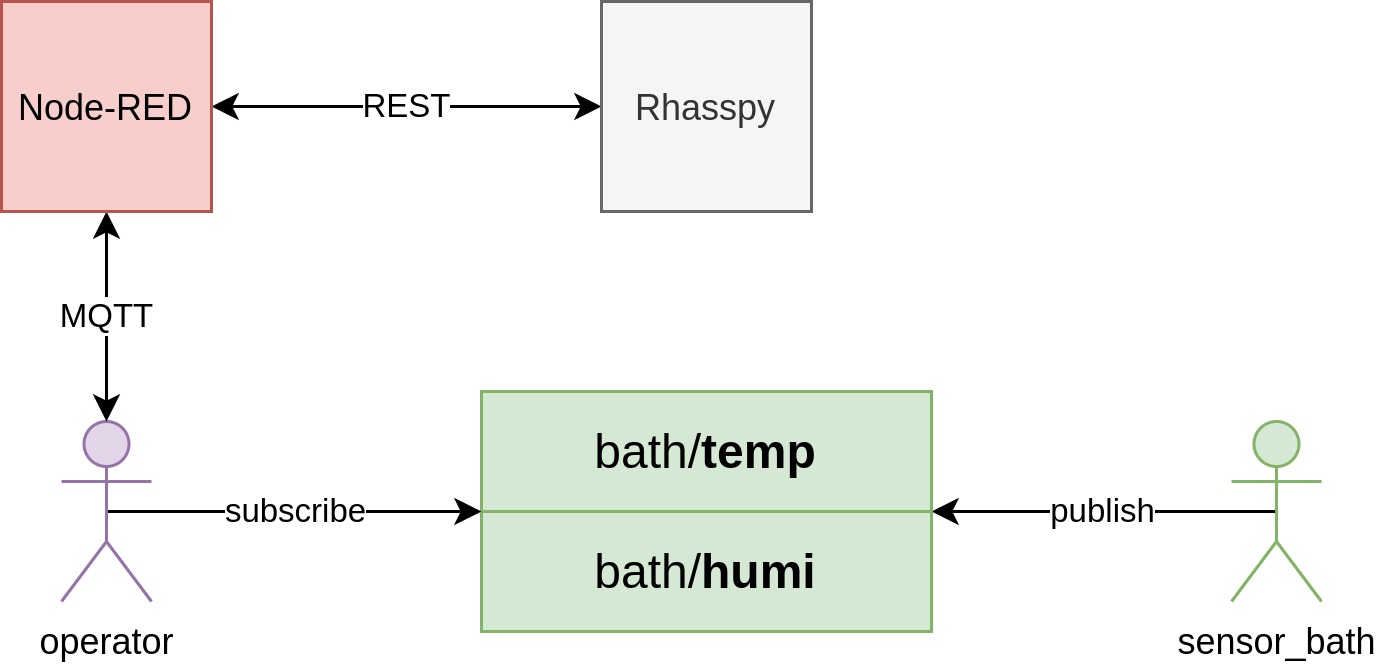
Clients can subscribe these topics to be informed about changes or publish content. In this example, temperate guards publish messages and Node-RED subscribes the topics to forward values to Rhasspy:
Every message needs to have one of the following QoS definitions:
| Method | Explanation |
|---|---|
| at most once | Message is sent once (clients might not receive it in case of network problems) |
| at least once | Message is sent until it has been acknowledged (can be received multiple times) |
| exactly once | Message is received exactly once, even in case of network problems |
Using the retained flag the broker can act as condition database by preserving the last value of a message for other/new clients. With those temperature guards coming into picture this is very useful to avoid having clients need to wait for the next message (15 minutes in the worst case) containing the current temperature.
Installing and configuring Mosquitto
I decided to use Mosquitto as container. Raspbian also offers a native package, but I always had connection problems after a couple of days I was unable to fix. Once the issue arised, the broker was still active but no messages were transmitted anymore. I found no hints in the error protocol and only restarting the service helped - what a pity. In addition, Rhasspy and Node-RED are already running within containers - so another container won't be a pain. 🙂
The mosquitto project offers an actively maintained image for different architecturen including ARM. I created the following docker-compose configuration file:
 1version: "3"
 2
 3services:
 4  mosquitto:
 5    container_name: mosquitto
 6    image: eclipse-mosquitto:latest
 7    ports:
 8      - "1883:1883/tcp"
 9    volumes:
10       - "./mosquitto.conf:/mosquitto/config/mosquitto.conf"
11       - "./conf.d:/mosquitto/config/conf.d"
12       - "/mosquitto/data"
13       - "/mosquitto/log"
14    restart: unless-stopped
The complete code of this and following articles can be found on GitHub
The service can be accessed using TCP port 1883 - configuration, data and protocol files are outsourced using volumes. The main configuration file (mosquitto.conf) contains the following lines:
1persistence true
2persistence_location /mosquitto/data/
3
4log_dest file /mosquitto/log/mosquitto.log
5
6include_dir /mosquitto/config/conf.d
Using the persistence parameters retained messages are basically enabled and a database location is defined. log_dest defines the protocol file path. The include_dir directive enables moving configuration instructions in additional files underneath the conf.d folder.
In file conf.d/acl.conf I defined paths for ACL (Access Control List) and the password file. Anonymous access without any accounts is disabled:
1acl_file /mosquitto/config/conf.d/acl
2password_file /mosquitto/config/conf.d/pwfile
3allow_anonymous false
The ACL defines three users:
 1# admin
 2user admin
 3topic readwrite #
 4topic readwrite $SYS/#
 5
 6# operator
 7user operator
 8topic read #
 9topic read $SYS/#
10
11# sensor_bath
12user sensor_bath
13topic readwrite bath/temperature
14topic readwrite bath/humidity
admin has full access to all topics while operator only has read access. That the user that Node-RED will use - in later parts of this series the user will get additional permissions, e.g. to control power controls. The user sensor_bath has only read/write access to topics relevant for it: bath/temperature and bath/humidity.
The password file is a simple text file with the following format:
1<user>:<password>
The password is defined in PBKDF2 format - the easiest way to create those passwords is using the mosquitto_passwd command. It is part of the mosquitto package. The first user is created like this:
1$ mosquitto_passwd -c pwfile admin
To create additional users, refer to the following commands:
1$ mosquitto_passwd -b pwfile operator
2$ mosquitto_passwd -b pwfile sensor_bath
The ACl and password files must only be readable/writable by the owner - otherwise the broker will not work:
1$ chmod 0600 acl{,.conf} pwfile
Afterwards, create and start the container:
1$ docker-compose up -d
We will focus on linking Node-RED and Rhasspy later in this post.
If you already have a circuit board running my example code, you should be able to read messages via MQTT:
1$ mosquitto_sub -h <node-red-ip-address> -u sensor_bath -P <password> -t bath/temperature
224.68
Weather API
There are plenty of weather APIs in the internet and some of them also offer a REST API. Unfortunately the most APIs are only available for paid users or after registration - which brings us back to the data privacy and profiling dilemma. Luckily I found a collection of some free services on GitHub. I decided to go for MetaWeather as this offers just exactly what I need - even though the service is still beta.
To find out the current weather you first need to find the next station or city - guess what, curl helps here:
1$ curl -O https://www.metaweather.com/api/location/search/?query=Berlin
2[{"title":"Berlin","location_type":"City","woeid":638242,"latt_long":"52.516071,13.376980"}]
Check-out the woeid property - it identifies the appropriate city.
Afterwards, the weather is measured like this:
1$ curl -O https://www.metaweather.com/api/location/<woeid>/
Replace woeid with your city!
The answer is really comprehensive - the most important fields are:
| Field | Description |
|---|---|
title |
City name |
latt_long |
Latitude/Longitude |
time |
Current time |
sun_rise / sun_set |
Sunrise and sunset time |
consolidated_weather |
Weather for current and following days |
sources |
Sources used for measurement |
To gather the current weather, the JSON answer's path consolidated_weather[0] needs to be read as it contains the following information:
| Field | Description |
|---|---|
weather_state_name, weather_state_abbr |
Weather state name/abbreviation (windy, cloudy,...) |
wind_direction_compass |
Wind compass point |
min_temp, max_temp, the_temp |
lowest, hightest and current temperature |
wind_speed |
Wind speed |
air_pressure |
Air pressure |
humidity |
Humidity |
For measuring the next day, path consolidated_weather[1] is used, for the day after next check-out consolidated_weather[2], etc. The day forecast differs per station.
Sentences and flow
To enable Rhasspy serving new functions, we need to define appropriate Sentences in the web interface:
 1[GetTemperatureInRoom]
 2room_name = (bedroom | workroom| bath | living room | kitchen)
 3what's the temperature in <room_name>
 4what's the humidity in <room_name>
 5how (warm | cold) is it in the <room_name>
 6how (humid | dry) is it in the <room_name>
 7
 8[GetTemperature]
 9what's the temperature outside
10outside temperature
GetTemperature refers to the weather API online while GetTemperatureInRoom should retrieve data via MQTT. There are plenty of rooms defined, they are adressed via the room_name variable. So it is not necessary to define a dedicated command per room. After clicking Train the voice assistant applies changes.
The next step is to enhance the handler within Node-RED.
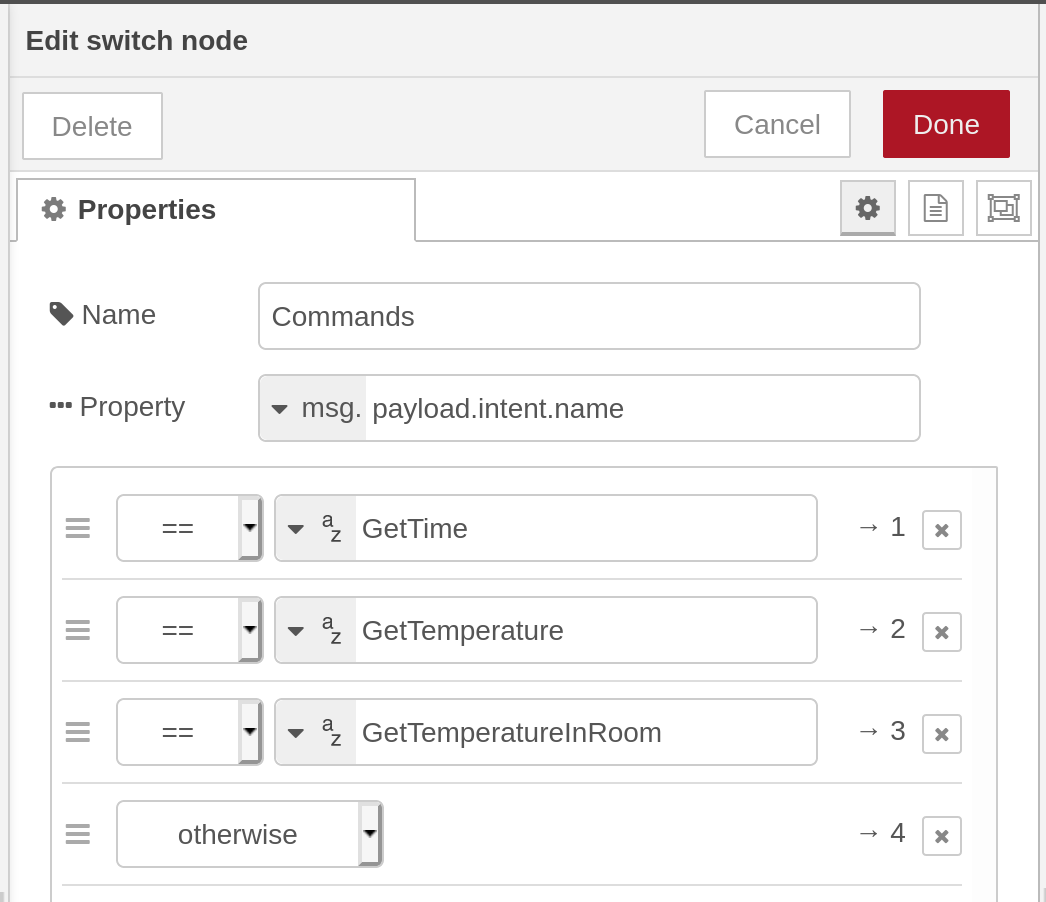
First of all, two new cases are added to the Commands switch by double-clicking it:
GetTemperature- temperature via internetGetTemperatureInRoom- temperature per room via sensor
Afterwards, drag a http request node into the work area and connect it with the GetTemperature branch. Apply the following settings:
- Method: GET
- URL: https://www.metaweather.com/api/location/
/ - Name: Weather API
Replace woeid with your city!
Next, connect the node's output with a function node. By double-clicking set the name to Set values and add the following source code:
1var weather = msg.payload.consolidated_weather[0];
2flow.set("temp_outside", Math.round(weather.the_temp));
3return msg;
This code retrieves the current temperature and saves it to the variable weather, that can be accessed within the flow using the local environment variable temp_outside. This variable is only available within the current flow (the Rhasspy handler). In the next step, we will access it in order to return a sentence that is ready for read out.
For this, a template node is connected with the function's output. Apply the following settings:
- Name: Intent response
- Format: Mustache template
- Output as: Parsed JSON
Double checking having the format set to Mustache template in order to replace the variable. The actual template looks like this:
 1{
 2  "intent": {
 3      "name": "GetTemperature",
 4      "confidence": 0
 5  },
 6  "speech": {
 7    "text": "The outside temperature is {{ flow.temp_outside }} degrees."
 8  },
 9  "wakeId": "",
10  "siteId": "default",
11  "time_sec": 0.010800838470458984
12}
Again, values required by Rhasspy are defined - speech.text is set to a sentence that contains the current temperature. By clicking Done the assisant is closed. Connect the template node output with the already existing http reponse node (Send answer).
The flow should now look like this:

To save changes, click Deploy - test it with curl:
1$ curl -H "Content-Type: application/json" -X POST -d '{"intent": {"name": "GetTemperature"}}' http://<node-red-ip-address>:1880/intent
2{"intent":{"name":"GetTemperature","confidence":0},"speech":{"text":"The outside temperature is 18 degrees."},"wakeId":"","siteId":"default","time_sec":0.010800838470458984}
That looks good! 🙂
Time for the second function - reading the sensors.
For this, add another function node to the flow and connect it's input to the remaining switch case (GetTemperatureInRoom). Double-click it, set the name to Set values and add the following code:
 1// set room
 2var room = msg.payload.tokens.pop();
 3flow.set("room", room);
 4
 5// round values
 6var temperature = global.get("temperature");
 7var humidity = global.get("humidity");
 8flow.set("temperature", Math.round(temperature[room]));
 9flow.set("humidity", Math.round(humidity[room]));
10
11return msg;
A variable with the name room is defined with the last entry of the tokens array from the payload. Let's remember - Rhasspy splits a sentence's particular words and the last word contains the room. The room is defined as environment variable. After that two variables - temperature and humidity - are defined. These variables are planned to contain the values retrieved via MQTT. In a dedicated handler we will create in a minute, the values are retrieved via MQTT and defined as global environment variables. This is necessary because the MQTT handler is a dedicated flow and we cannot access its variables directly. In the next step, the values are rounded as we don't really need decimal points and saved as local environment variables for the current flow. Of course the logic could be added to the Rhasspy handler as well - but this would not make things clearer. Therefore - let's keep it clear by creating another flow.
Afterwards, drag a template node next to the function node and connect output and input. Double-click and apply the following settings:
- Name: Intent response
- Format: Mustache template
- Output as: Parsed JSON
The template looks like this:
 1{
 2  "intent": {
 3      "name": "GetTemperatureInRoom",
 4      "confidence": 0
 5  },
 6  "speech": {
 7    "text": "{{ flow.room }}'s temperature is {{ flow.temperature }} degrees, the humidity is {{ flow.humidity }}%."
 8  },
 9  "wakeId": "",
10  "siteId": "default",
11  "time_sec": 0.010800838470458984
12}
Again, speech.text contains a sentence with appropriate values.
Finally, the template output is connected to the http response node - making the flow look like this:

By clicking Deploy changes are applied. Before we can use the new functionality, an additional MQTT handler needs to be created. To accomplish this, click the plus icon in the right top to create a new flow. Define the name Room handler.
First of all, drag a mqtt in node in the working area and double-click it. Click Server and Add new mqtt-broker and the pencil icon. In the following dialog, enter the appropriate MQTT connection details:
- Name: select a name
- Server: Host IP address
- Topic: created topic, e.g.
bath/temperature - Security -> Username: created user
- Security -> Password: appropriate password
Save the changes by clicking Done. Next, drag a change node next to it and connect output and input. Enter the following settings:
- Name: Store bath temperature
- Set:
global.temperature["bath"] - To:
msg.payload
This will ensure saving a message's content from the MQTT topic bath/temperature once it is received to the global array temperature[bath]. Repeat these steps for the second topic (bath_humidity). The flow should now look like this:

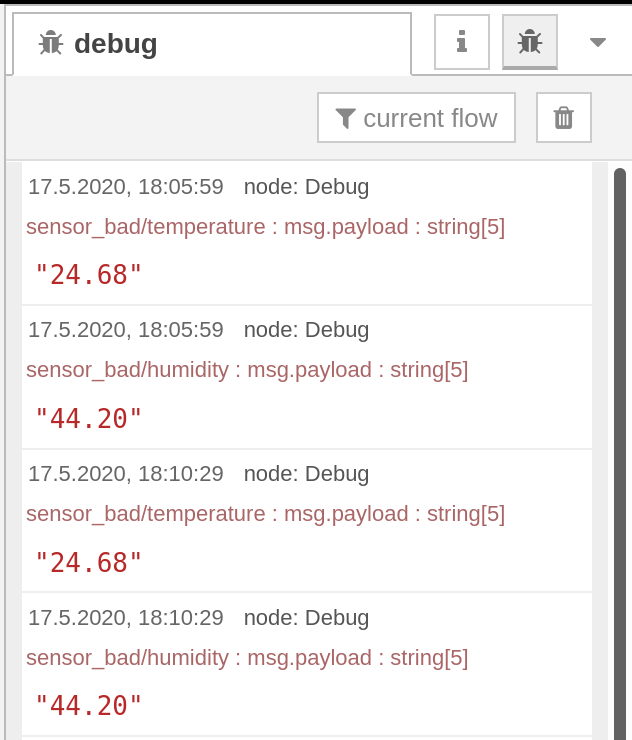
If you want to monitor multiple rooms, simply repeat the steps for additional rooms. After clicking Deploy changes are applied and received values are now cached by Node-RED. After restarting one of the temperature guards, received messages can be seen in the Debug view.
Now, both handlers should finally interact with each other. Time for a final test - this time we will either use the Rhasspy interface or the voice command.
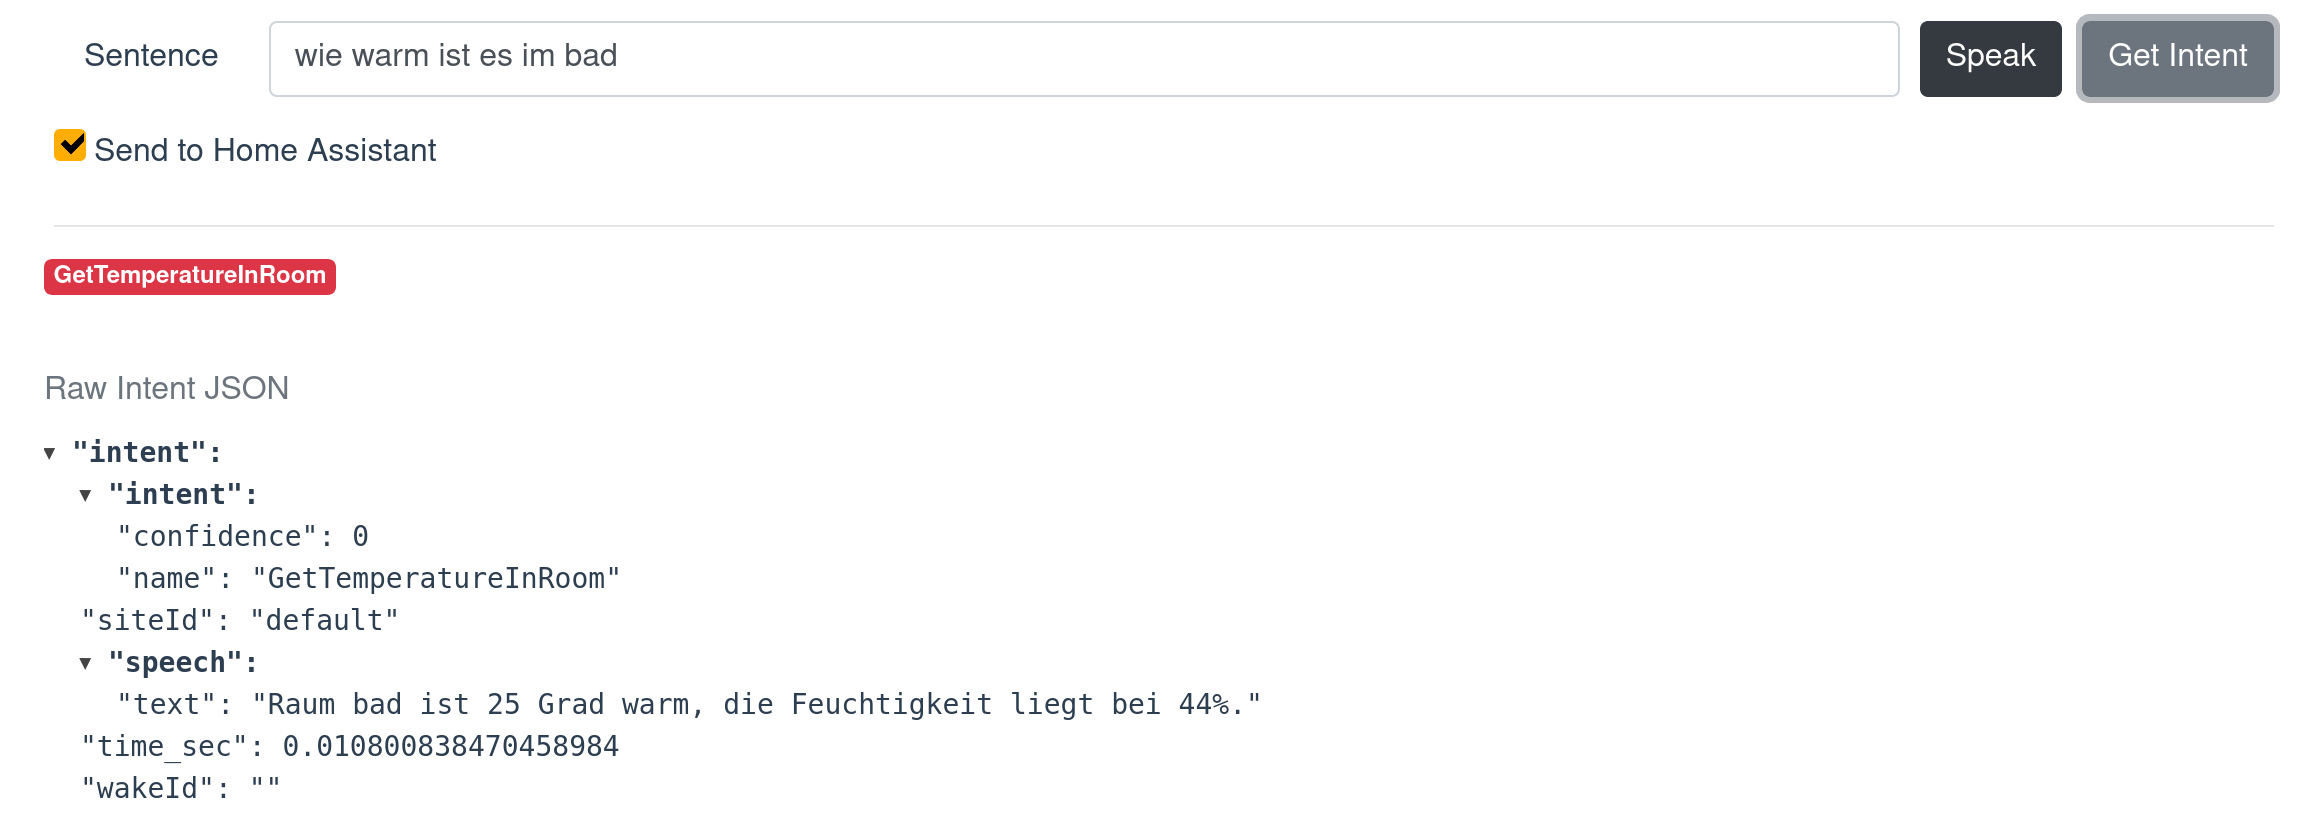
Awesome, this looks good! 🙂
Conclusion
In this part our voice assistant learned measuring weather using the internet and room temperatures via MQTT. For measuring weather we're only using a small part of API possibilities - we could implement additional functionality (e.g. weather forecast for the next day).
In the next part of this series we will improve entertainment by implementing a online radio a joke API.