Configure LACP under CentOS along with Cisco
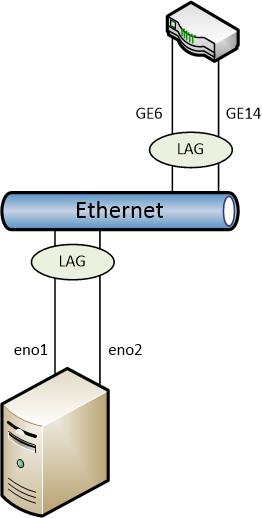
If a host has multiple physical network adapters, it is a common procedure to combine the particular links. Mostly, this configuration is chosen to enhance the maximal throughput. Another reason for this is to make network connections more reliable by defining alternative network paths. LACP (Link Aggregation Control Protocol, 802.3ad standard) combines those two approaches by grouping physical adapters logically. As long as enough physical uplinks are available, they are used to spread network traffic frame-wise (continous sessions are excluded from this behavior to ensure correct package orders). If a network path fails, the channel is automatically reconfigured - this is also called dynamic trunking. LACP needs to be supported by the switch as well as by the connected host because of automatic configuration streams.
Switch preparations
The switch configuration varies depending on the vendor and model. I'm using a Cisco SG300-28 L3 switch in my home lab. The following steps demonstrate the configuration using the web interface:
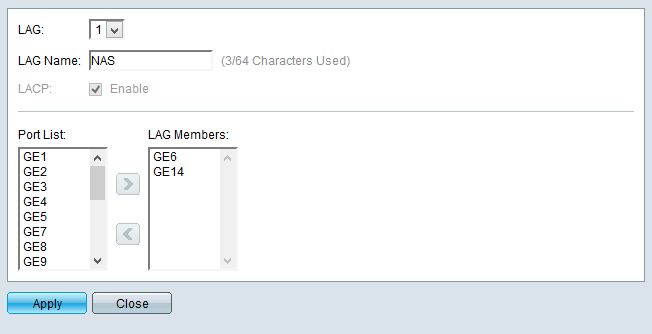
- Select Port Management > Link Aggregation > LAG Management in the menu on the left.
- Select a free LAG port from the list and click Edit.
- Enter a short description and select the used switch ports. Save the configuration by clicking Apply.
- For advanced settings (e.g port auto negotiation, optional), click LAG Settings in the menu on the left. Select the port and click Edit.
Configuration under CentOS
The Linux configuration varies depending on the distribution. I'm using CentOS - the following steps might need to be changed for other Linux distributions.
First of all, it is necessary to ensure that the kernel module for network teaming (bonding) gets loaded during the boot. An alias defining the network interface name is set - e.g. bond0 for the first bond. If you want to configure multiple bonds, you can define multiple entries - e.g. bond1 and bond2. Afterwards, the module is loaded:
1# echo "alias bond0 bonding" > /etc/modprobe.d/bonding.conf
2# modprobe bond0
The next step is to alter the configuration of participating network interface. Pre-existing IP information need to be removed and the interface is defined as Slave. On Enterprise Linux-based Linux distributions, these configuration files are stored in the /etc/sysconfig/network-scripts directory:
 1# vi /etc/sysconfig/network-scripts/ifcfg-eno1
 2NAME="eno1"
 3DEVICE="eno1"
 4ONBOOT=yes
 5BOOTPROTO=none
 6USERCTL=no
 7MASTER=bond0
 8SLAVE=yes
 9
10ESC ZZ
This step is repeated for all other participating network interfaces. Afterwards, a configuration file for the bond interface is created:
1# vi /etc/sysconfig/network-scripts/ifcfg-bond0
2NAME="bond0"
3DEVICE="bond0"
4BONDING_OPTS="mode=4 miimon=100"
5ONBOOT=yes
6BOOTPROTO=static
7...
8
9ESC ZZ
The line BONDING_OPTS is important, it defines options for the bonding drive. The parameter mode defines the bonding mode, the value 4 enables LACP in this case. miimon defines the time frame in milliseconds, the network connection is probed for connectivity. The smaller the value, the faster network outages are recognized - - 100 is a decent default value.
Afterwards, the network is restarting - alternatively you can only bring up the new bond by using the ifup command:
1# service network restart
2# ifup bond0
If everything worked fine, the /proc file system now contains information about the bonding:
 1# less /proc/net/bonding/bond0
 2Ethernet Channel Bonding Driver: v3.7.1 (April 27, 2011)
 3
 4Bonding Mode: IEEE 802.3ad Dynamic link aggregation
 5Transmit Hash Policy: layer2 (0)
 6MII Status: up
 7MII Polling Interval (ms): 100
 8Up Delay (ms): 0
 9Down Delay (ms): 0
10
11802.3ad info
12LACP rate: slow
13Min links: 0
14Aggregator selection policy (ad_select): stable
15Active Aggregator Info:
16 Aggregator ID: 1
17 Number of ports: 2
18 Actor Key: 9
19 Partner Key: 1000
20 Partner Mac Address: xx:xx:xx:xx:xx:xx
21
22Slave Interface: eno1
23MII Status: up
24Speed: 1000 Mbps
25Duplex: full
26Link Failure Count: 1
27Permanent HW addr: xx:xx:xx:xx:xx:xx
28...
29Slave Interface: eno2
30MII Status: up
31Speed: 1000 Mbps
32Duplex: full
33Link Failure Count: 0
34Permanent HW addr: xx:xx:xx:xx:xx:xx
35...
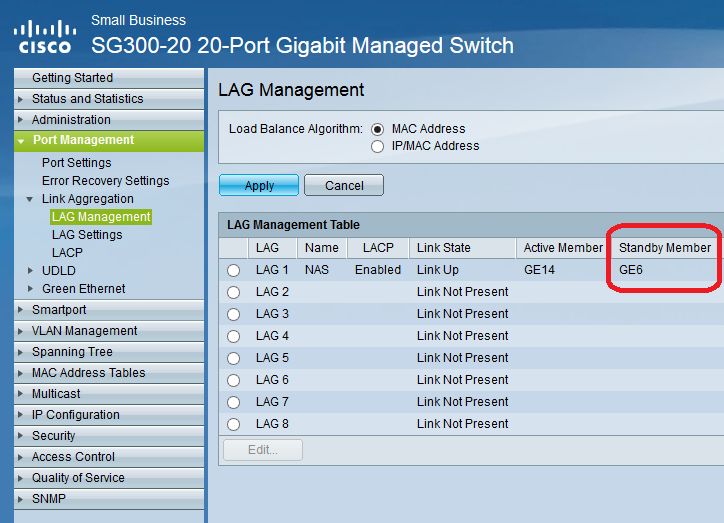
In the Cisco web interface the active links can be seen as well (Port Management > Link Aggregation > LAG Management):

The following screenshot and outputs demonstrate recognizing a failed link in the Cisco web interface (standby member) and the Linux system:
 1# dmesg
 2...
 3[277202.078630] tg3 0000:03:00.0 eno1: Link is down
 4[277202.079761] bond0: link status definitely down for interface eno1, disabling it
 5[277202.079796] bond0: first active interface up!
 6
 7# less /proc/net/bonding/bond0
 8Ethernet Channel Bonding Driver: v3.7.1 (April 27, 2011)
 9...
10802.3ad info
11LACP rate: slow
12Min links: 0
13Aggregator selection policy (ad_select): stable
14Active Aggregator Info:
15        Aggregator ID: 1
16Number of ports: 1
17...
18Slave Interface: eno1
19*MII Status: down
20Speed: Unknown
21Duplex: Unknown
22Link Failure Count: 2
23...